 Print Documents (11:40)
An invoice template is a document that is used to present a final invoice to a customer for service preformed.
Before reading this article, consider watching this video:
Follow these steps to add or edit an invoice template:
To access print documents, click on the Setup button in the ribbon and then click Print Documents in the left window pane as shown in this figure:
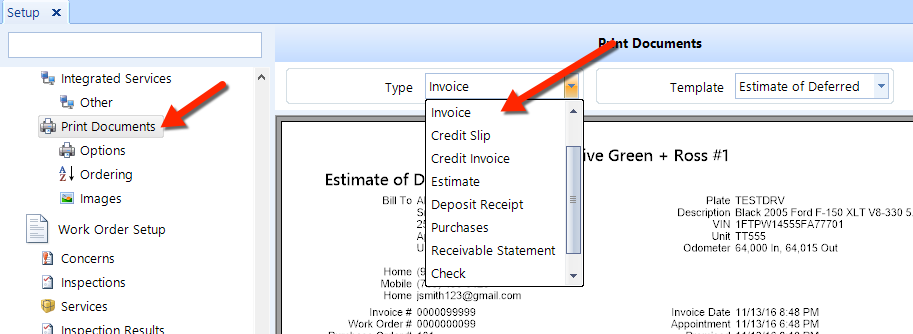
From the Type drop-down list, choose the Invoice Order document type (see the figure above).
To add a template, click the Add button in the ribbon.
To edit an existing template, choose it from the Template drop-down list and click the Edit button in the ribbon.
The document editor popup will open and a preview of the existing template will appear in the right window pane (see the figure below).
In the sections below, we explain how to edit all of the properties for the template.
As shown in the figure below, click the Load button to load a file from your file system that has preconfigured settings for your document.
Click Export to place your document settings into a file that you can later import (using the Load button).
From the drop-down list, choose the level of Zoom that you want to see in the preview window.
Click Undo to discard any changes that you have made to the document since the last save.
Click OK to save the template and exit, or click Cancel to discard all of your changes and exit.
You can edit the following in this section.
Name: The name of the document, or template, as it will appear in the templates list once saved.
Description: The description you wish to give to the document to explain its purpose. It does not appear anywhere on the document itself and is for reference only
Page Setup – click this button to open a popup window in which you can edit the following:
Paper Size: choose either a letter or legal paper size.
Margins: You can set the left, right, top and bottom margins of the page in inches
Orientation: choose either portrait or landscape.
Click OK to save your changes, or click Cancel to discard.
Type – this is the type of document template (unchangeable).
Email Text – click on the Edit button to opens the editor, in which you can prepare a message that will appear at the top of the outbound message when the document is sent by email. In the editor window, you can do the following:
Text Area: edit the text in the open area provided, much like you would in a word processor.
Apply: saves your changes and returns to the document template.
Cancel: returns to the document template and abandons your changes.
Undo: undo your most recent changes since you last saved your changes.
Redo: if you would like to revert your last undo operation use the redo button to bring it back.
Set the font family, font size, font color, weight, style and decoration.
Logo – click the small button at the top-right of the logo image to choose an image file from file system. Click the small X button beside the logo image to delete the existing image.
Logo Width – Enter the width of the logo, in inches. This field supports up to two decimal places, and will automatically scale the height of the image accordingly.
Spacing – the spacing around the logo, in inches.
Text – click the Edit button to edit the text you want to appear in the header. In the editor window, you can do the following:
Text Area: edit the text in the open area provided, much like you would in a word processor.
Apply: saves your changes and returns to the document template.
Cancel: returns to the document template and abandons your changes.
Undo: undo your most recent changes since you last saved your changes.
Redo: if you would like to revert your last undo operation use the redo button to bring it back.
Set the font family, font size, font color, weight, style and decoration.
Repeat – check this box to enable the header to repeat on subsequent pages.
Title – click the Edit button to edit the title of the document. In the editor window, you can do the following:
Text Area: edit the text in the open area provided, much like you would in a word processor.
Apply: saves your changes and returns to the document template.
Cancel: returns to the document template and abandons your changes.
Undo: undo your most recent changes since you last saved your changes.
Redo: if you would like to revert your last undo operation use the redo button to bring it back.
Set the font family, font size, font color, weight, style and decoration.
Layout – from the drop-down, choose the layout for Bill To, Service Item and Information. As you make changes, you can see the result in the preview pane.
Inspection – choose your preference from the drop down menu:
None: When you print the work order, the technician inspection sheet will not print with it automatically
Normal: When you print the work order, the technician inspection sheet will print with it automatically. If the inspection form has been edited the results will also print.
In-line: When you print the work order, the technician inspection will appear inside the main body of the work order appended to each inspection
Blank Form: When you print the work order, the technician inspection sheet will print with it automatically. If the inspection form has been edited the results will not print and a blank inspection form will print
Comment – click the Edit button to edit comments that will appear below the totals. In the editor window, you can do the following:
Text Area: edit the text in the open area provided, much like you would in a word processor.
Apply: saves your changes and returns to the document template.
Cancel: returns to the document template and abandons your changes.
Undo: undo your most recent changes since you last saved your changes.
Redo: if you would like to revert your last undo operation use the redo button to bring it back.
Set the font family, font size, font color, weight, style and decoration.
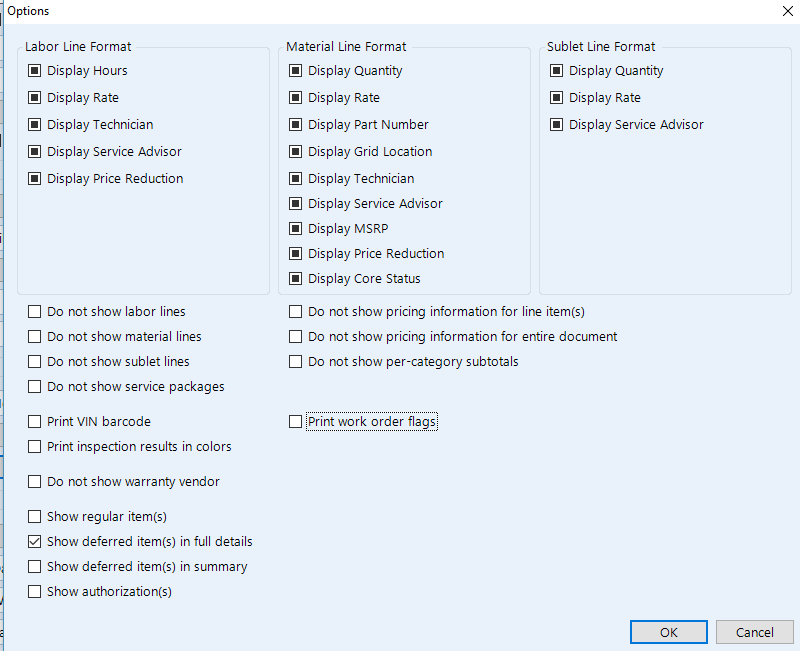
Advanced Options – click the Edit button to make changes to formatting options for work order line items.
Text – click the Edit button if you wish to edit the text contain in the footer at the bottom of the document's page. In the editor window, you can do the following:
Text Area: edit the text in the open area provided, much like you would in a word processor.
Apply: saves your changes and returns to the document template.
Cancel: returns to the document template and abandons your changes.
Undo: undo your most recent changes since you last saved your changes.
Redo: if you would like to revert your last undo operation use the redo button to bring it back.
Set the font family, font size, font color, weight, style and decoration.
Left – from the drop-down list, choose what you would like to display on the left side of the footer.
Middle – from the drop-down list, choose what you would like to display on the middle of the footer.
Right – from the drop-down list, choose what you would like to display on the right side of the footer.