 Enterprise Payable
Setup Part 1
Enterprise Payable
Setup Part 1You can create accounts payable at the enterprise level, and associate one or more locations with these payable accounts. When entries are made on these accounts at the location-level, they go against the enterprise general ledger.
In this article, you'll find instructions for adding, editing, and deleting enterprise accounts payable. All other aspects of managing enterprise accounts payable are similar to the procedures for single-location accounts payable.
Watch the following videos as a supplement to reading this article:
Enterprise Payable
Setup Part 1
Enterprise Payable
Setup Part 2
To access this feature, do the following:
Click on the Enterprise Setup button in the Home ribbon.
In the left window pane, find the Accounting > Accounts Payable node beneath the Enterprise Setup folder.
Access the Enterprise Accounts Payable feature, as we explain in the first section. Then follow the steps below for editing, adding, or deleting a payable account.
Search for and select a specific payable account, as we explain in the section above.
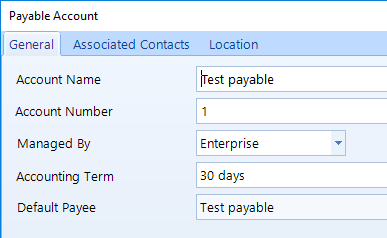
Click the Edit button in the ribbon to display a popup containing the details of the account, as shown in the figure below.
Edit any of the information on the three tabs: General, Associated Contacts, and/or Location.
Follow these steps to create a new payable with a contact:
Click the Add button in the ribbon to open the Payable Account popup.
If you only want to create a basic payable account with no contacts, check the second box and continue to the next subsection.

To create a payable account with a contact, check the first box and then click the Next button to move to the next panel.
Enter the Contact information, and then click the Next button.
Enter all of the information for the account on the General tab.
To add a location: click on the Location tab, click the Action drop-down button, then click Add.
Search for the location, then click the location in the listing. Hold the Shift key and click with the mouse to choose multiple locations. Click OK to close the popup.
Click the Save button to close the account popup and commit your changes.
Follow these steps to create a payable account without a contact:
Click the Add button in the ribbon to open the Payable Accounts popup.
Check the second box to create a bare payable account and click the Next button.
Enter all of the information for the account on the General tab.
To add a location: click on the Location tab, click the Action drop-down button, then click Add.
Search for the location, then click the location in the listing. Hold the Shift key and click with the mouse to choose multiple locations. Click OK to close the popup.
Click the Save button to close the account popup and commit your changes.
Later, you can add contacts by following the instructions in the next section.
You can associate one or more contacts with a payable account, which gives you the flexibility of having multiple suppliers posting to the same payable account.
Follow these steps to associate a contact with a payable account:
Access the Enterprise Accounts Payable feature as given in the instructions of the first section.
Search for and select a specific enterprise payable account.
In the Payable Account popup, click the Associated Contacts tab (see the figure below), which lists any contacts which already have an association with the account.
To associate another contact, click the Add button.
In the Contacts window, add a new contact–or search for an existing contact.
After choosing a contact, click the Save button in the Payable Account popup.

Follow these steps to associate a contact with an enterprise payable account:
Access the Enterprise Accounts Payable feature as given in the instructions of the first section.
Search for and select a specific enterprise payable account.
Click the Delete button in the ribbon.
Type "yes" into the field and click OK to confirm the deletion.