The software has the ability to email documents directly from it saving you from having to save documents to a file and then attach them to an message in your email program of choice.
In the sections below, you'll find explanations on how to perform these tasks:
Accessing Workstations Settings in Setup
Modify General settings
Modify Emails settings
Modify Device settings
To access Workstation Settings, follow these steps:
Click on the Setup button in the ribbon.
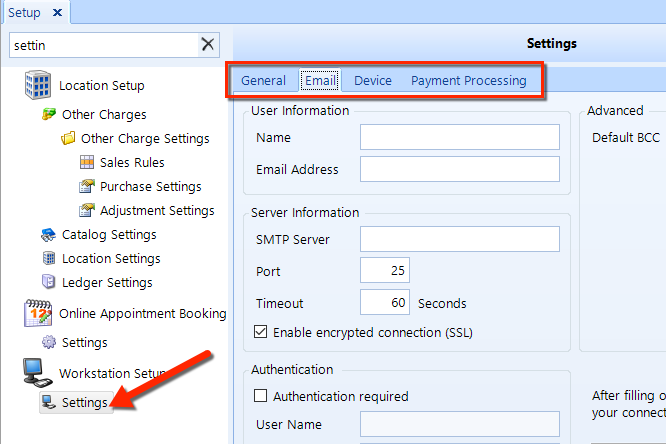
Click the Settings item beneath the Workstations Setup node of the tree menu in the left window pane.
Four tabs appear in the main window: General, Email, Device, and Payment Processing.
Access Workstations Settings using the instructions above, and then click the General tab.
There is only one setting in the General tab.
Check the box if this workstations is to be used as a shared time clock.
Click the Save button in the ribbon.
Access Workstations Settings using the instructions above, and then click the Email tab.
In the User Information section, enter the Name that will appear as the sender in outbound messages, and also enter the Email Address to which you want replies sent.
In the Server Information section, enter the SMTP Server of your email provider, the Port port used by your email provider for outbound messages (the default value is 25), the Timeout value–which is the number of seconds to reattempt sending the email message (the default value is 60 seconds). Also, check the Enable encrypted connection (SSL) box if your email provider uses SSL.
In the Authentication section, check the Authentication Required box if your email provider requires you to provide a user name and password to send mail. Also, enter a User Name and Password for your email account.
In the Advanced section, in the Default BCC field, enter the email address you wish to blind carbon copy (BCC) on each message you send.
In the Test Connection section, click the Test Connection button to verify that the email system functions correctly according to the settings that you specified in the previous steps. If the test is successful, you will receive a test email message at the email address given in the User Information section. If you do not receive an email then the settings may be incorrect.
Click the Save button in the ribbon.
Access Workstations Settings using the instructions above, and then click the Email tab.
In the Magnetic Stripe section, check the Enabled box to use the magnetic stripe reader that is attached to this workstation to capture card information.
In the Signature Capture section, check the Enabled box to use the signature capturing device that is attached to this workstation.
Click the Save button in the ribbon.
Vendor: Choose a vendor from the drop down list and complete the corresponding dialog based on the vendor's instructions.