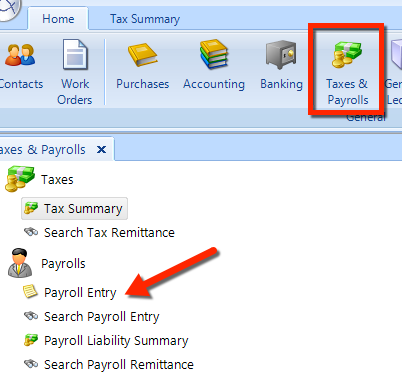
Navigate to the Home tab.
- Click the Taxes & Payroll button in the the ribbon.
On the left side—in the Taxes & Payrolls tree—click Payroll Entry.
With the Payroll feature, you can manage basic payroll tasks for you shop staff—including detail payroll entry and printing of payroll checks.
These are the tasks that you can perform in Payroll:
Payroll Entry
Search Payroll
Payroll Liability
Search Payroll Remittance
Print Payroll Checks
Print Payroll Slips
Follow these steps to access the Payroll feature:
|
|
You may want to make changes to Payroll Setup, especially if this is your first time using Payroll. Of course, if you are doing payroll for a new employee, you’ll need to add that employee in Employees.
In this feature, you can:
Create payroll entries
Print payroll checks
Training database: Our examples here make use of the training database, which contains several fictitious employee profiles. First, we look at creating an entry for an employee who has had a previous payroll. Then, we see how to create an entirely new payroll entry from scratch. |
Most often, you’ll create payroll entries for employees who already have previous payroll entries—and often those previous payroll entry values are good for reuse on the current payroll entry.
Follow these steps to create a payroll entry for an employee that already has at least one previous entry:
|
 |
In the next two sections, we explain how to create an entirely new payroll entry and finalize it.
Let’s see how easy it is to make an entirely new payroll entry. Follow these simple steps:
In the Payroll Entry employee listing, locate and click on the item for Fred Wrench (Wrench, Fred).
Click the Create Payroll Entry button in the Payroll Entry ribbon.
Since there are no previous entries for this employee, the Payroll Entry panel is empty.
The Pay Period has a default of This month, so the Pay Period Start and Pay Period End are set to match that period. You can change any of these values.
Add a payroll item by click the + button to the right of the grid. For this example, choose Hourly Wage.
Enter a Rate of 30.00 and Hours of 40.00. The Amount updates as the product of the Rate and the Hours.
Let’s add another payroll item, to represent some overtime work. Click the small + button on the right edge of the Payroll Item grid. Then, from the drop-down just below the first payroll item, choose Bonus and then enter 40.00 for the Rate and 8.00 for the Hours.
After entering the payroll items, let’s enter three Payroll Liability items, CPP, EI, and Federal Income Tax. Each liability corresponds to a Payroll Agency, which are configurable in Payroll Setup. CPP, EI, and Federal Income Tax roll up to the Receiver General payroll agency.
Read the Payroll Liability Summary section below learn how to find the total outstanding liability for each payroll agency.
Here’s how you enter liabilities:
CPP — Click the drop-down and choose CPP (pension plan), then enter 79.20 for both the Employee Amount and the Employer Amount (since the amounts must be equal in Canada).
EI — Click the small + button on the right edge of the Payroll Liability grid. Choose EI (Employment Insurance) from the drop-down, and then enter 76.00 for the Employee Amount and 106.52 for the Employer Amount.
Federal Income Tax — Click the small + button on the right edge of the Payroll Liability grid. Choose Federal Income Tax from the drop-down, and then enter 196.45 for the Employee Amount and 0.00 for the Employer Amount (there is no employer contribution in the US and Canada).
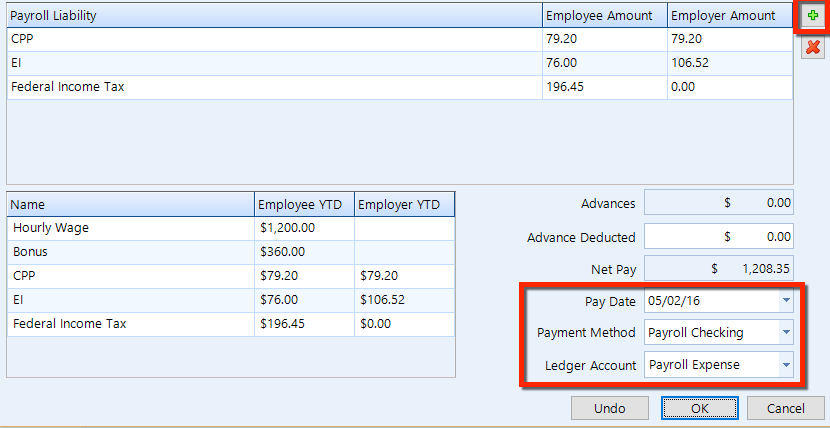
The Net Pay calculates automatically, but you need to choose the Pay Date and the Payment Method.
Step 5 – If necessary, you can change the Ledger Account.
The next section explains how to commit the payroll entry.
When committing the payroll entry, you can print the check along with the paystub in the next print run. Or, you can opt to print only a pay stub instead of a check.
Click OK to view the Check popup.
Uncheck the To be printed box if you only want the payroll slip to print and avoid printing a check for this entry next print run. See the sections below, Print Payroll Checks and Print Payroll Slips.
Click Save to commit this payroll entry.
You can give an employee a payroll advance. On the very next payroll entry for this employee, a value will appear in the Advances field.
Follow these steps to make a payroll advance:
In the Payroll Entry employee listing, locate and click on the item for Fred Wrench (Wrench, Fred).
Click the Create Payroll Entry button in the Payroll Entry ribbon.
Select Payroll Advance from the Payroll Item drop-down.
Enter the Amount of the advance.
At the bottom of the Payroll Entry window, choose the Pay Date and the Payment Method.
Click OK to view the Check popup.
Uncheck the To be printed box if you only want the payroll slip to print and avoid printing a check for this entry next print run. See the sections below, Print Payroll Checks and Print Payroll Slips.
Click Save to commit this payroll entry.
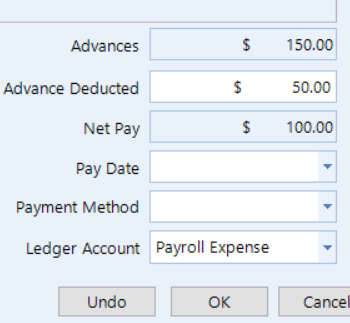
In the future—when a payroll entry occurs for this employee, the Shop Manager system will account for any advances given to this employee since the last payroll entry. A value will appear in the Advances field, which is the total of all advances for this employee since the last entry.
To deduct an advance in a future payroll entry, simply enter a value for Advances Deducted. This can be the entire amount or a partial amount. |
 |
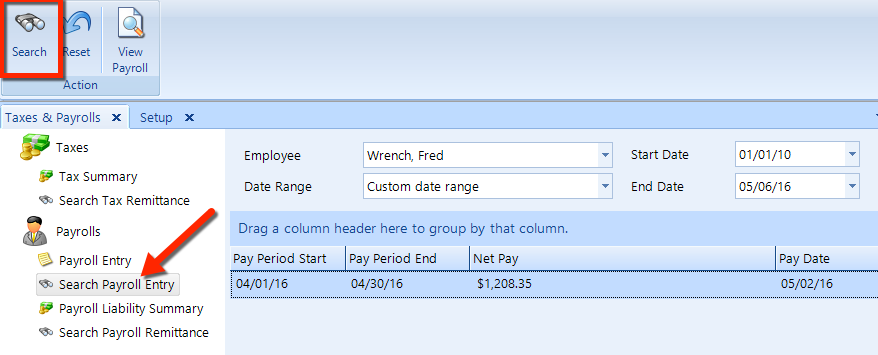
Use the Search Payroll Entry feature to search for one or more payroll entries for a specific employee. There is an option for the date range, and you can further restrict the search by choosing start and end dates.
Follow these steps to search for payroll entries:
In the Taxes and Payrolls tree, click on Search Payroll Entry as shown in the figure below.
At the top of the main panel, select the Employee and choose the type of Date Range.
To further restrict the time range, choose a Start Date and End Date.
In the Payroll Search ribbon at the very top, click Search.
If any items are shown in the listing, click on that item to display the payroll entry.
Payroll liabilities are amounts that the company owes to a payroll agency and has not yet paid. These liabilities include items such as payroll tax amounts and vacation accruals that accumulate from the payroll entries over time.
Payroll agencies are configured in [Setup], and liabilities accumulate from the deductions taken with each payroll entry. The Payroll Liability Summary feature gives you the ability to view the total outstanding payroll liability for each payroll agency.
Shop Manager tracks your outstanding payroll liabilities, as they increase with each payroll entry. When you do your payroll, Shop Manager calculates how much is owed to the corresponding payroll agency for each tax, deduction, and company contribution payroll item. With each paycheck you write, the balances of various liability accounts will increase. When you pay your taxes or other payroll liabilities, Shop Manager decreases the balance of the liability account that corresponds to the agency to which you make payment.
These are the default payroll agencies:
Accrued Vacation Pay
Employee Payroll Benefits, such as health insurance contributions
Receiver General (Canada) or IRS (United States)
Here are a few other agencies that you could add in Payroll Setup:
401(k) contributions
Employee ROA Agency (Request of Absence)
Union dues
Garnishments for child support
There are options for the type of date range, and you can further restrict the search by choosing start and end dates.
Follow these steps to view liabilities for Employee Payroll Benefits:
In the Taxes and Payrolls tree, click on Payroll Liability Summary as shown in the figure below.
At the top of the main panel, select Employee Payroll Benefits for the Payroll Agency and choose the type of Date Range.
To further restrict the time range, choose a Start Date and End Date to display a listing of liabilities that match the search criteria (similar to the figure below).
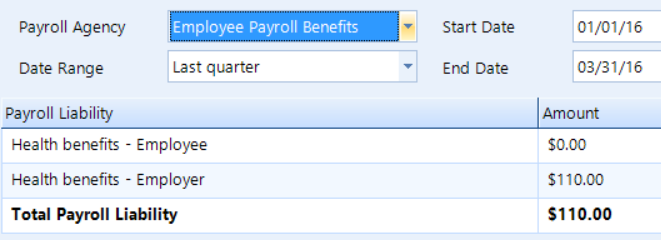
In the figure, we see that an amount of $110.00 is an outstanding health benefits liability. Double-click an item in the listing to view the details, such as you can see in this figure:

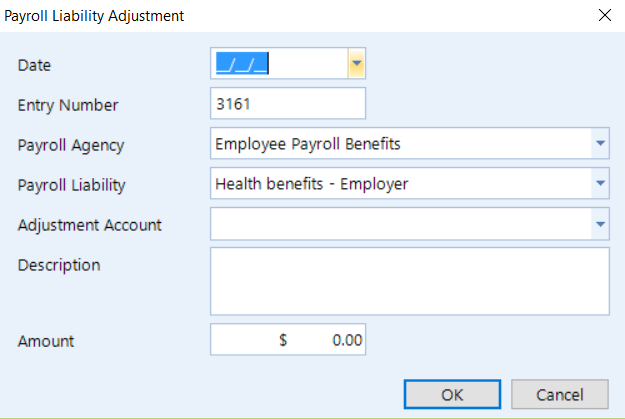
It may be necessary to enter a payroll liability adjustment to reflect an extra payment or make correction. These are a few example scenarios that are correctable with a liability adjustment:
You made a health insurance company contribution and need to correct the amount of the liability amount (after creating a new payroll company contribution item with the correct tax type.
You need to increase or decrease amounts for company contribution items, such as a Health Savings Account (HSA) or a company match on retirement savings.
To make an adjustment, simply click the Adjustment button on the Payroll Liability ribbon, and then enter the details of the adjustment in the popup window (see the figure below).
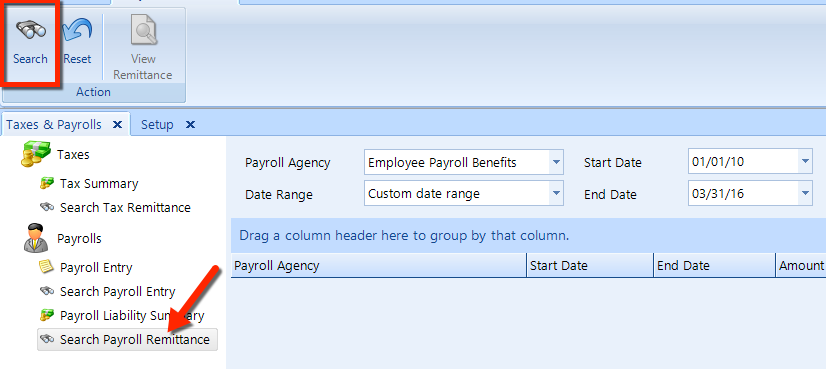
Use the Search Payroll Remittance feature to search for one or more payroll remittances. There are options for the type of date range, and you can further restrict the search by choosing start and end dates.
Follow these steps:
In the Taxes and Payrolls tree, click on Search Payroll Remittance as shown in the figure below.
At the top of the main panel, select the Payroll Agency and choose the type of Date Range.
To further restrict the time range, choose a Start Date and End Date.
In the Payroll Remittance ribbon at the very top, click Search.
If any items are shown in the listing, click on that item to display the remittance details.
Follow the steps below to print payroll checks.
Click on Payroll Entry in the left window pane.
Click on the Print Payroll Checks command button in the Utility group on the ribbon to display the Print Checks popup, as shown in the figure below.
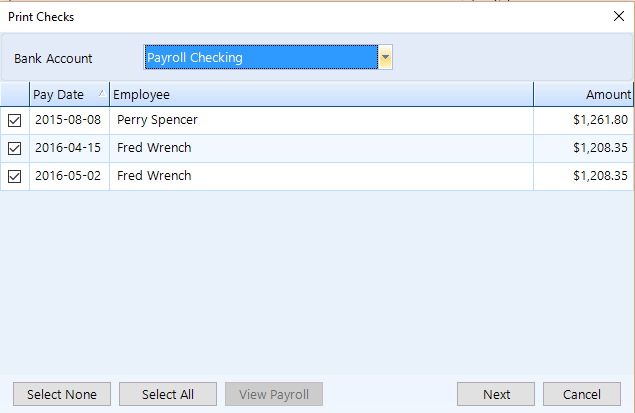
Select the Bank Account from the drop down list. The list of checks ready for printing will appear in the listing, displaying for each one the Pay Date, Employee and Amount.
Uncheck the box for any check that you don’t want to print in this run. Optionally, you can use the Select None and Select All buttons.
Click the Next button, and then choose the Printer and Tray on which you want the checks to print.
Choose the Document Template, and enter the Check number of the first check. Take care to load the paper checks in the correct order.
Click the Start button to begin printing.
After a moment, the Confirm Printed Checks popup will appear.
Uncheck the box for any check that didn’t print correctly, then click on the Confirm button.
| Checks
that don't print correctly: Any check that you indicate
did not print correctly will be put back into the print payroll
check queue to be processed again on the next check run.
Checks that did print correctly will have the necessary debits taken from the corresponding bank account. |
Follow the steps below to print payroll slips/paystubs.
Click on Payroll Entry in the left window pane.
Click on the Print Payroll Slips command button in the Utility group on the ribbon to display the Print Payroll Slips popup, as shown in the figure below.
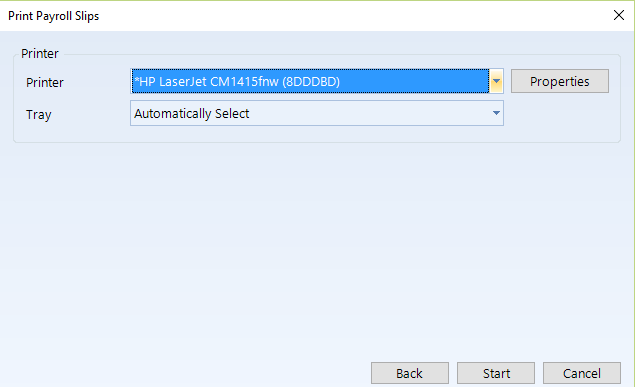
Choose the Printer and Tray on which you want the checks to print.
Click the Start button to begin printing.
After a moment, an alert will appear to confirm that all slips have been printed.
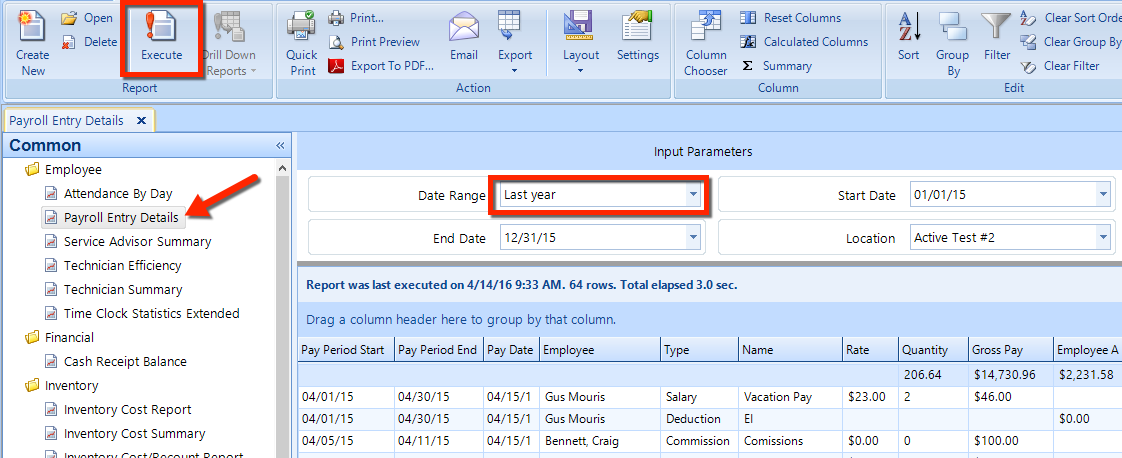
Basic payroll reporting is available, by which you can easily see what your gross payroll is for a specific period.
It's easy to run the report:
In the Home ribbon, click Reports.
Click the Common button in the lower left.
Locate Payroll Entry Details in the Employee section (in the reports tree on the left side).
Choose a Date Range, such as Last year.
Click the Execute button.