A general ledger account is an account for sorting and store balance sheet and income statement transactions. Examples of general ledger accounts include the asset accounts such as Cash, Accounts Receivable, Inventory, Investments, and Equipment. Examples of general ledger liability accounts include Notes Payable, Accounts Payable, and Accrued Expenses Payable. Examples of income statement accounts that are found in the general ledger include Sales, Salaries Expense, Rent Expense, Advertising Expense, Interest Expense, and Loss on Disposal of Assets.
Some general ledger accounts are summary records, which are commonly known as control accounts. The detail that supports each of the control accounts will be found outside of the general ledger in what is known as a subsidiary ledger. For example, Accounts Receivable could be a control account in the general ledger, and there will be a subsidiary ledger which contains each customer's credit activity. These general ledger accounts could also be control accounts: Inventory, Equipment, and Accounts Payable. For each of these there could be a subsidiary ledger containing the supporting detail.
In this article, you'll find explanations on how to setup your ledger accounts. Next, you'll want to read how to manage these accounts in the General Ledger help chapter.
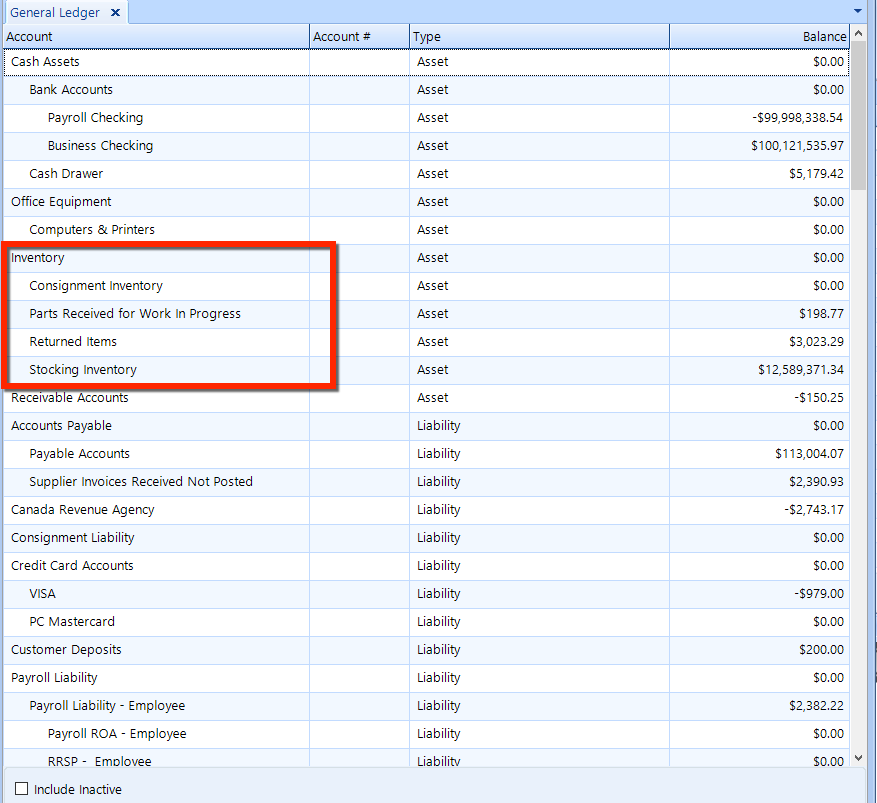
To access the general ledger, click the General Ledger button in the ribbon. The chart of accounts will appear in the listing, as shown in the figure below. Assets are shown at the top, followed by liabilities, equity, and expenses.
Notice that there are parent and child accounts, as seen in the Inventory parent account in the figure above. The Inventory account contains four child accounts: Consignment Inventory, Parts Received, Returned Items, and Stocking Inventory.
Using the buttons in the ribbon, you can edit, create, deactivate, and delete general ledger accounts. See the instructions in the sections below.

Follow these steps to edit an existing general ledger account:
Click on the account, (such as the Inventory parent account), and click the Edit button in the ribbon.
The Account Name uniquely identifies the account in the ledger. It can contain only text or have a numeric prefix. An example would be "1400- Inventory".
The Account Type is set at the time the account is created. The account type is either an asset, liability, equity, or expense.
The Parent Account is set only for child accounts–accounts that roll up to a parent. The Inventory account is a parent account, so the setting is <Not Sub-account>.
Optionally, you can enter a Description for this account.
A check in the Subtotal Only box means that transactions cannot post to this account. Typically, this setting applies to a parent account. It is common for the parent account to function as a roll up, grouping, or summary container and the transactions to go against child accounts.
Check the Inactive box to deactivate the account and hide it from the default ledger listing. See the section on deactivation below.
Click the OK
button to close the edit popup window.
To understand parent and child account relationship, let's look more closely at the Return Items account, which is a child account of the Inventory parent account.
Click the Returned Items account name in the ledger, and then click the Edit button in the ribbon to display the popup window:
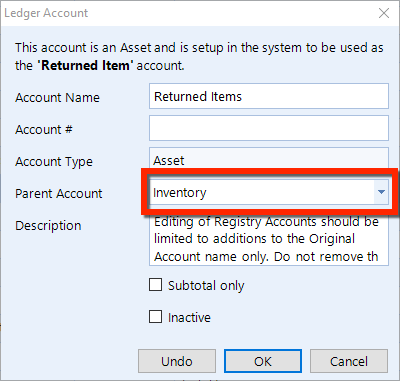
You can see that the Parent Account is set to Inventory.
Nesting child accounts: a child account can be the parent account of other child accounts. |
Creating a general ledger account is much like editing an existing account. After reading the explanation in the section above, Editing a General Ledger Account, follow these steps to create an account:
Click on the New Account button in the ribbon to display the popup window.
Enter the Account Name and set the Account Type in the drop-down.
If this is to be a child account, choose the Parent Account from the drop-down.
Optionally, enter a Description for this account.
If necessary, check the Subtotal Only box, which will prevent any transactions from posting to this account (typically applies to a parent account).
Later, you can check the Inactive box to deactivate the account and hide it from the default ledger listing. See the section on deactivation below.
Click the OK button to close the edit popup window . The new account will appear in the ledger, according to its type and also according to its status as either a child or parent account.
It's only possible to delete a general ledger account if it has never had any transactions.
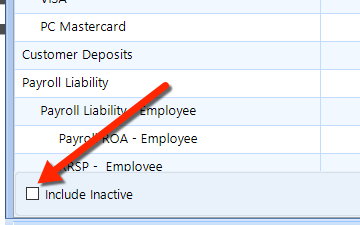
Alternatively, you can deactivate an account by marking it as inactive. Thereafter, the account will only appear when the Include Inactive box is checked.
An alternative method for managing ledger accounts is through the Setup module. There, you find ledger accounts listed by type. It's easy to search by filtering on account name and account type. Inactive check boxes appear on each account in the listing that make it easy to deactivate one or more accounts. From here, you can add, edit and delete ledger accounts.
To manage ledger accounts through the Setup module, do the following:
Click on the Setup button in the ribbon.
In the left window pane, locate Accounting > Ledger Accounts.
Click on Ledger Accounts to display the ledger accounts in the right panel, as shown in the figure below.

Also through Setup, it's possible to change the mapping of how various types of system transactions post to specific accounts.
CAUTION: These mappings are preset during the installation of Shop Manager, and we strongly recommend that you only make changes after consulting with Shop Manager Support. |
To access ledger settings and modify these settings, follow these steps:
Click on the Setup button in the ribbon.
In the left window pane, locate Location Setup > Ledger Settings.
Click on Ledger Settings to display the ledger accounts in the right panel, as shown in the figure below.
After consulting with Support, choose a different account from the drop-down in the Ledger Account column.
After accessing ledger settings as given in the instruction of the previous section, look for the Fiscal Year Begin drop-down at the bottom of the main window. Simply choose the date that matches the start of the fiscal year for your company.
