 Concerns
Concerns are problems that a customer reports when requesting a diagnosis or repair of their vehicle or service items.
In this article, we cover the following:
Add, edit, or delete a concern
Add or edit a labor item
Add or edit material lines
Add or edit a sublet
Add, edit, or delete line items
Add, edit, or delete a relationship
Duplicate a concern
Before reading this article, consider watching this video:
To access the Concerns feature in setup, click on the Setup command button in the Home ribbon, then click Work Order Setup > Concerns in the left window pane.
To add or edit a concern, follow these steps:
Access Concerns in Setup, as shown in the section above.
To add a new concern, click the Add command button in the ribbon.
To edit an existing concern:
Select a Profit Center from the drop-down.
Select a Service Category from the drop-down.
Optionally, type in a full or partial Code that the concern contains.
Optionally, type in a full or partial Title that the concern contains.
Click the Search command button in the search group of the ribbon.
Click on the concern you wish to edit in the list and then click the Edit command button in the ribbon, or simply double-click the concern.
As you edit the concern, you can click Save to commit any changes, click Cancel to exit without saving any changes, and click Undo to discard all the changes you made since the last save.
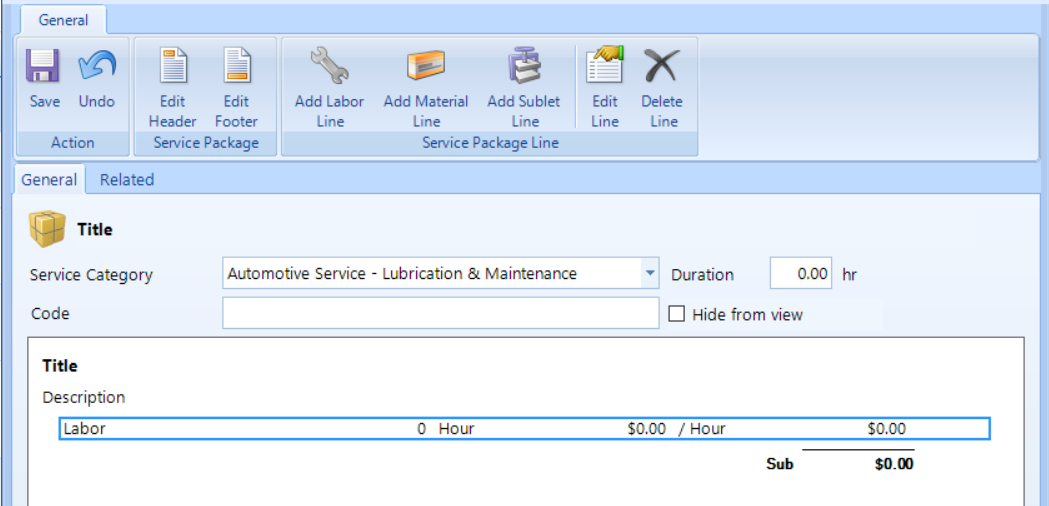
From this drop-down, choose a profit center and service category for the concern.
Optionally, enter any text that you want to use to further define or group the concern. For more information about codes, read the common uses for codes topic.
Enter a time value in this field to calculate the work order when the labor line still has a lookup required status.
To edit the header for a concern, click the Edit Header button on the service package group of the ribbon and then enter the following:
Title – enter a concise yet descriptive title of the concern in this field. This title will appear on any inspections listings, including what the service advisor sees when adding concerns to a work order.
Description – enter a description of the concern in this field. Typically, the description of the concern elaborates on the title, but many shops choose to include questions they want the service advisor to ask the customer to collect all necessary information for the concern.
Footer
The footer consists of a title and description. To edit the concern footer, click the Edit Footer button on the ribbon. Typically, the footer highlights an important note about the concern.
Title – Enter a concise yet descriptive title of the concern in this field. The footer title appear in bold type below all of the material and labor items on the concern.
Description – Enter a description of the concern in this field. Typically, the description elaborates on the footer title.
To add a new labor line to the concern, click the Add Labor Line button in the Service Package Line group of the ribbon.
General Tab
You can edit some or all of the fields in this tab:
Description – in this field, enter a description of the labor operation.
Lookup Required – check the box to compel the service advisor to lookup the labor time in the labor guide; uncheck the box to permit the work order to be posted as an invoice.
Price Type – from the drop-down list, choose the labor rate (not available in the Enterprise edition) or fixed rate/total.
Rate – Automatically set if you chose a labor rate from the Price Type. If you chose fixed rate, enter the rate you wish to use.
Hours – Enter in the billed hours you wish to credit your technician for the labor being sold. If you have specified that the Labor Guide Lookup is Required then specifying the hours here is optional.
Total – If you chose a labor rate and entered in hours the total dollars billed will be automatically calculated. If you chose fixed total, enter the total dollars you wish to charge the customer for this labor operation.
Discount – displays the total discount applied (in dollars). To edit the discount, click on the word Discount and then edit the following:
Line Total – Displays the total dollar amount of the sale.
Discount Type – from the drop-down list, select the type of calculation for the discount: either a Percentage of a fixed Amount.
Total Discount – displays the total amount of the discount, in dollars.
Click OK to save your changes or Cancel to disregard.
Extended – This is the total of the labor charges, less any discounts but prior to applying taxes or other charges.
Tags Tab
Click the Tags tab to display or edit the tags associated with this line item.
Click the small  button
on the right hand side of the dialog to manage the tags
associate with this line item.
button
on the right hand side of the dialog to manage the tags
associate with this line item.
Tags - displays the tags currently associated with this item.
To
delete a tag, click the tag to select it and then click the  button.
You can search for tags, by entering a full or partial tag name to filter the tag list below the search line.
To associate a tag with the line
item, click the  next to the tag in the list.
Click OK to save your changes to tags.
Format Tab
Click the Format tab to display the formatting options for the line item, then set the state of the tri-state check box beside each option to control how the line item displays on a work order document.
Lookup Criteria
Here, you can set automatic searching for labor guide queries. Click the button to edit the criteria and the dialog opens displaying any existing criteria.
Add criteria by clicking the Action button and choose Add.
Select the catalog by checking the corresponding check box.
Search Type – Select how you wish to search the labor guide.
Keyword – enter the keyword or phrase to use in your automated search and then press Enter on your keyboard. If prompted, choose the closest matching keywords.
Category – Choose the category and sub-category to display when searching the labor guide.
Click the OK button to save your changes and close the pop-up window.
Delete Criteria – Select the criteria to delete by clicking on it then click the Action button and choose Delete.
After editing each of the tabs, click OK to save your changes and return to the concern editor.
To add a new material line to the concern, click the Add Material Line command button in the Service Package Line group of the ribbon.
General Tab
Description - in this field, enter a description of the material item.
Part Number - Filled in automatically if linked to an inventory item. Left blank if the part number will be unknown until item is sold.
Manufacturer - the company that made the item.
Lookup Required - check the box to compel the service advisor to lookup the item through the online catalog.
Click the inventory search button if you wish to link the material item to an inventory item. This can save time on the work order if the same inventory item is used every time for this application. Read more about inventory search below.
Definition - to set a definition for the item, click the small search binoculars icon. Click the small delete button beside the definition field to remove an existing definition.
Unit Cost - the cost of the item.
MSRP - the manufacturer suggested retail price.
Price Level - from this drop-down list, choose from one of your pre-determined price levels or fixed rate/total.
Price - this is automatically set if you chose a price level. Choose a fixed rate to edit the price value.
Core - this is automatically set if you linked the item to an inventory item with a core value.
Quantity - enter in the quantity being sold. If you have specified that the Catalog Lookup is Required, then specifying the quantity hours here is optional as the catalog, by default, will return the per car quantity.
Total - If you chose a price level and entered in quantity, the total dollars billed will be automatically calculated. If you chose fixed total, enter the total dollars you wish to charge the customer for this item.
Total Cost - this will populate automatically if you have linked the item to inventory. Otherwise, this field is zero dollars until the cost is known at the time of sale.
Margin - This will display the current calculated profit margin on the item based on the values in the unit cost and price fields. If you modify the value in the margin text box, the price value will be recalculated and vice versa. If you hover over the flag to the right of the margin text box, your desired profit margin based on your pricing matrix will be displayed. If you click on the flag the margin will be updated to reflect your desired margin.
Discount - displays the total discount applied (in dollars). To edit the discount, click on the word Discount and then edit the following:
Line Total – Displays the total dollar amount of the sale.
Discount Type – from the drop-down list, select the type of calculation for the discount: either a Percentage of a fixed Amount.
Total Discount – displays the total amount of the discount, in dollars.
Click OK to save your changes or Cancel to disregard.
Extended - This is the total of the labor charges, less any discounts but prior to applying taxes or other charges.
Inventory Search
To perform an inventory search, do the following:
Choose a Profit Center from the drop down list.
Select or enter any additional filters in the remaining parameters to limit your search and then click the Search command button in the action group on the ribbon.
Double-click on the material item in the list you need to use and the information will populate the material line item popup that is open in the background.
Source Tab
Use this tab is to determine your source of acquisition for the material item. This is either going to be inventory or a supplier for non-stocking inventory. Supplied items will be determined once the item is on a work order. Inventory items can be sourced by clicking on the Click here to search inventory link. These procedures are the same as searching inventory from the General tab.
Tags Tab
Click the Tags tab to display or edit the tags associated with this line item.
Click the small button
on the right hand side of the dialog to manage the tags
associate with this line item.
Tags - displays the tags currently associated with this item.
To
delete a tag, click the tag to select it and then click the
button.
You can search for tags, by entering a full or partial tag name to filter the tag list below the search line.
To associate a tag with the line
item, click the next to the tag in the list.
Click OK to save your changes to tags.
Format Tab
Click the Format tab to display the formatting options for the line item, then set the state of the tri-state check box beside each option to control how the line item displays on a work order document.
Lookup Criteria
Here, you can set automatic searching for labor guide queries. Click the button to edit the criteria and the dialog opens displaying any existing criteria.
Add criteria by clicking the Action button and choose Add.
Select the catalog by checking the corresponding check box.
Search Type – Select how you wish to search the labor guide.
Keyword – enter the keyword or phrase to use in your automated search and then press Enter on your keyboard. If prompted, choose the closest matching keywords.
Category – Choose the category and sub-category to display when searching the labor guide.
Click the OK button to save your changes and close the pop-up window.
Delete Criteria – Select the criteria to delete by clicking on it then click the Action button and choose Delete.
To commit all of the changes you have made in each of the tabs, click OK to save your changes and return to the concern editor.
To add a new sublet line to the concern, click the Add Sublet Line button in the Service Package Line group of the ribbon.
General Tab
You can edit some or all of the fields in this tab:
Description – in this field, enter a description of the labor operation.
Rate – enter a rate value, or leave at zero dollars until placed on the work order.
Quantity – Enter in the quantity being sold or leave at zero until placed on the work order.
Total - The total dollars billed if you entered a rate and quantity.
Total – If you chose a labor rate and entered in hours the total dollars billed will be automatically calculated. If you chose fixed total, enter the total dollars you wish to charge the customer for this labor operation.
Discount – displays the total discount applied (in dollars). To edit the discount, click on the word Discount and then edit the following:
Line Total – Displays the total dollar amount of the sale.
Discount Type – from the drop-down list, select the type of calculation for the discount: either a Percentage of a fixed Amount.
Total Discount – displays the total amount of the discount, in dollars.
Click OK to save your changes or Cancel to disregard.
Extended – This is the total of the labor charges, less any discounts but prior to applying taxes or other charges.
Tags Tab
Click the Tags tab to display or edit the tags associated with this line item.
Click the small button
on the right hand side of the dialog to manage the tags
associate with this line item.
Tags - displays the tags currently associated with this item.
To
delete a tag, click the tag to select it and then click the
button.
You can search for tags, by entering a full or partial tag name to filter the tag list below the search line.
To associate a tag with the line
item, click the next to the tag in the list.
Click OK to save your changes to tags.
Format Tab
Click the Format tab to display the formatting options for the line item, then set the state of the tri-state check box beside each option to control how the line item displays on a work order document.
To commit all of the changes you have made in each of the tabs, click OK to save your changes and return to the concern editor.
To edit a line item, click on it to select it and then click the Edit Line command button in the Service Package Line group of the ribbon. Once the editor opens, edit the line item using the Add Labor Line, Add Material Line or Add Sublet Line instructions.
To delete a line item, click on the line item and then click on the Delete command button in the Service Package Line group on the ribbon.
In the Related tab, you can assign inspections and services that are either put on the work order in addition to the concern or replace it entirely. How the related items behave is established in Service Package Relationships.
Follow these steps to add a relationship:
Either click the Add Inspection or Add Service Package command button in the ribbon to open a popup.
Choose a Profit Center from the drop-down.
Choose a Service Category from the drop-down.
Optionally, enter a full or partial Code to filter your search results.
Optionally, enter a full or partial Title to filter your search results.
Click the Search button.
Select an inspection or service package from the list.
Click OK to view the relationships in the Service Package Relationships popup.
Select the relationship you wish to use by clicking the box next to it and click OK.
The relationship is now established.
To delete a relationship, choose it from the list and click the Delete Related button in the ribbon.
To delete a concern, do the following:
Access Concerns using the steps in the first section of this article.
Select a Profit Center from the drop-down.
Select a Service Category from the drop-down.
Optionally, enter a full or partial Code that the concern contains.
Optionally, enter a full or partial Title that the concern contains.
Click the Search button in the ribbon.
In the list, click on the concern you want to delete and then click the Delete button in the ribbon.