 Payable Setup
Accounts payable are accounts you have established with your suppliers and vendors. These accounts will contain transactions that have been posted to be paid at a later time or credits received to be applied against those transactions owing. It is also where you will reconcile and pay amounts owing for the account.
Watch the following video as a supplement to reading this article:
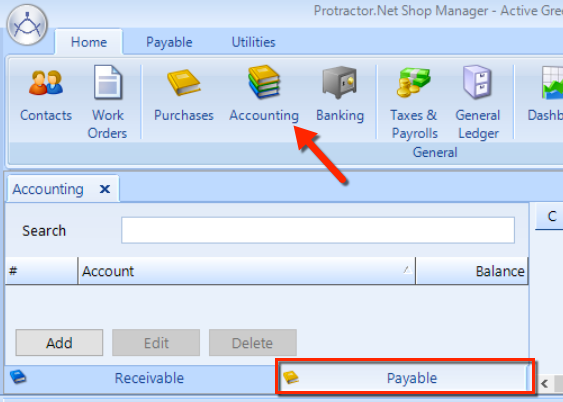
To access this feature, click the Accounting button in the Home ribbon and then click on Payable the tab at the bottom of the left window pane, as shown in the figure.
In the sections below, we explain how to perform these tasks:
Accessing Accounts Payable
Searching for an Existing Payable Account
Add, Edit, or Delete a Payable Account
Sorting Transactions for a Payable Account
Print, Export, or Email Payable Account Detail
Email Details of the Payable Account
Printing and Emailing Account Statement
Finding Specific Transactions in Payable Account Details
View a Supplier Invoice or Transaction Details
Viewing / Adjusting a Payable Transaction
Make a Payment
Applying a Credit
Delete a Payable Transaction
Purge One or More Payable Accounts
Reconcile the Payable Account
To access this feature, click the Accounting button in the Home ribbon and then click on Payable the tab at the bottom of the left window pane.

Follow these steps to search for a payable account:
Access the Accounts Payable feature, as we explain above.
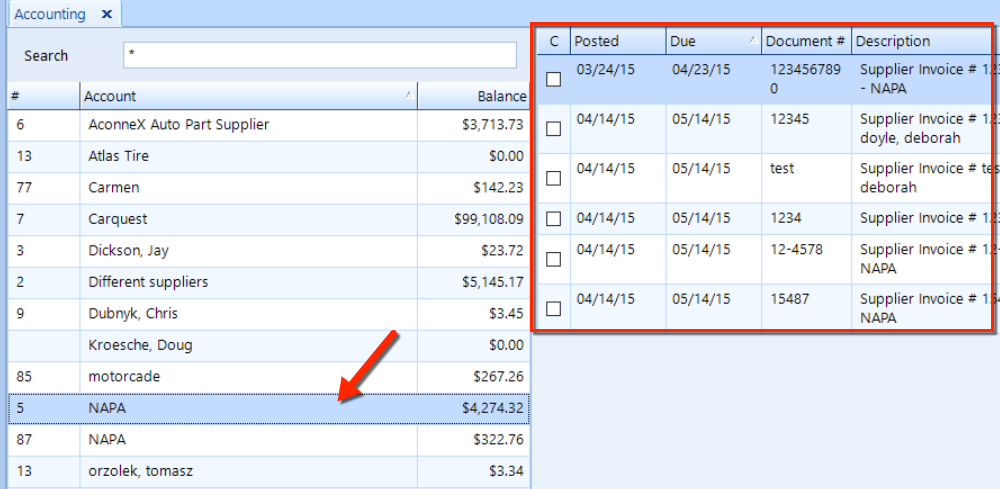
Click in the Search field at the top of the left window pane, enter you search term and then press the Enter key (or click the Search button in the ribbon).
Select the payable account from the resulting list in the left window pane.
The detail of the payable account will appear in the right window pane.
Access the Accounts Payable feature, as we explain in the first section. Then follow the steps below for editing, adding, or deleting a payable account.
Search for and select a specific payable account, as we explain in the section above.
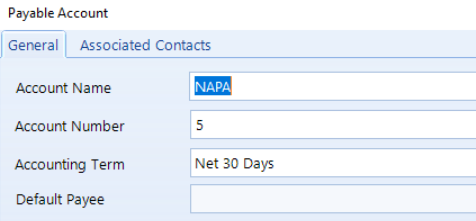
Click the Edit command button in the ribbon to display a popup containing the details of the account.
This procedure is identical to what is given in the Setup > Accounting > Payable Accounts article in this guide. Follow these steps to create a new payable with a contact:
Click the Add button in the ribbon to open the Payable Account popup.
If you only want to create a basic payable account with no contacts, check the second box and continue to the next subsection.

To create a payable account with a contact, check the first box and then click the Next button to move to the next panel.
Enter the Contact information, and then click the Next button.
Enter all of the information for the account and click the Save button.
Follow these steps to create a payable account without a contact:
Click the Add button in the ribbon to open the Payable Accounts popup.
Check the second box to create a bare payable account and click the Next button.
Enter all of the information for the account and click the Save button.
Later, you can add contacts by following the instructions in the next section.
You can associate one or more contacts with a payable account, which gives you the flexibility of having multiple suppliers posting to the same payable account. Follow these steps to associate a contact with a payable account:
Access the Accounts Payable feature, then search for and select a specific payable account (instructions can be found in the sections at the top of this article).
In the Payable Account popup, click the Associated Contacts tab (see the figure below), which lists any contacts which already have an association with the account.
To associate another contact, click the Add button.
In the Contacts window, add a new contact–or search for an existing contact.
After choosing a contact, click the Save button in the Payable Account popup.

Follow these steps to associate a contact with a payable account:
Access the Accounts Payable feature, then search for and select a specific payable account (instructions can be found in the sections at the top of this article).
Click the Delete command button located in the ribbon.
Type "yes" into the field and click OK to confirm the deletion.
To sort the transactions listing for a Payable account, simply click on the header of any column to sort by that column .

Click a second time to reverse the sort order. (See the figure below.)
| NOTE: The running balance amount may become erroneous if the sort is on a column other than the Date column. |
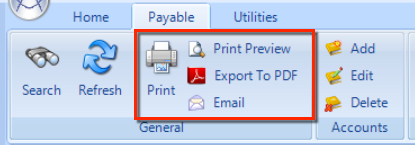
To perform any of these actions, begin by accessing the Accounts Payable feature, then search for and select a specific payable account (instructions can be found in the sections at the top of this article).
Follow these additional steps to preview the printout of the payable account details:
Click the Print Preview button in the ribbon.
The Windows Print Preview popup will appear, on which you can choose from multiple options for previewing the document.
Click the x to close the preview window.
Follow these additional steps to print a hardcopy of the payable account details:
Click the Print command button located in the General group of the ribbon.
The Windows Print popup will appear, on which you can choose from multiple options and print the document.
Click OK to print the document.
Follow these additional steps to print a hardcopy of the payable account details:
Click the Export to PDF button in the ribbon to open the Export to PDF popup.
Navigate to the location in your file system in which to save the PDF document.
Edit or enter the filename.
Click the Save button to create the PDF file and close the popup.
Follow these steps to send an email of the details for a payable account:
Click the Email button in the ribbon to open the Email popup.
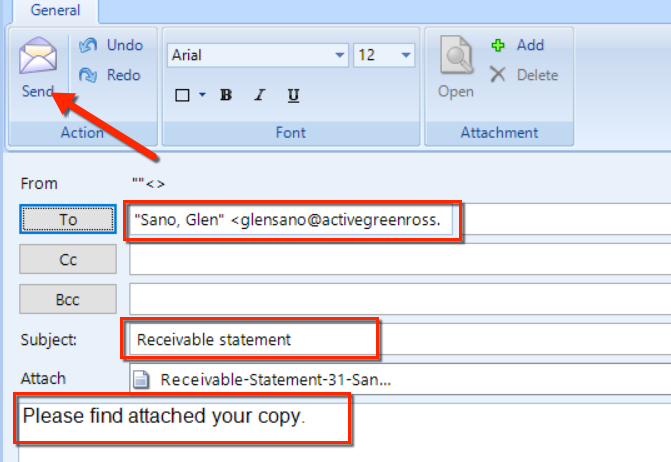
Review the TO email address to ensure it is correct, or enter another email address for the primary recipient. See the figure below.
If necessary, add email addresses in the CC and BCC fields.
Edit the Subject, if necessary.
Optionally, edit the body of the email message and click Send button in the ribbon.
Follow these steps to print and/or email the details for a payable account:
Access the Accounts Payable feature, then search for and select a specific payable account (instructions can be found in the sections at the top of this article).
Click the Statement button in the ribbon to open the Statement popup. See the figure below.
Using the drop-down, choose a Start Date and End Date elect the applicable date range.
Check the boxes to either Print and/or Email the statement. Select the applicable check box to print or email.
Click the Next button.
Choose a Printer and Tray, if necessary.
If you chose to print, the Windows Print popup window will appear, in which you can set your printing options. Click OK to print the statement.
If you chose to email, the Email popup opens, in which you can edit the email much like we explain in the previous section.
Follow these steps to locate specific transaction(s) for a payable account:
Access the Accounts Payable feature, then search for and select a specific payable account (instructions can be found in the sections at the top of this article).
Click on a payable account listing on the left.
If the transaction list on the right is extensive, click the Find button located in the ribbon to display the Find popup window.
Make selections in the Find and Compare drop-downs, and enter all or part of the search term in the Value field.
Click the Find All to display a listing of all matching transactions, or click the Find Next button to iterate through each transaction.
Follow these steps to locate a specific supplier invoice for a payable account:
Access the Accounts Payable feature, then search for and select a specific payable account (instructions can be found in the sections at the top of this article).
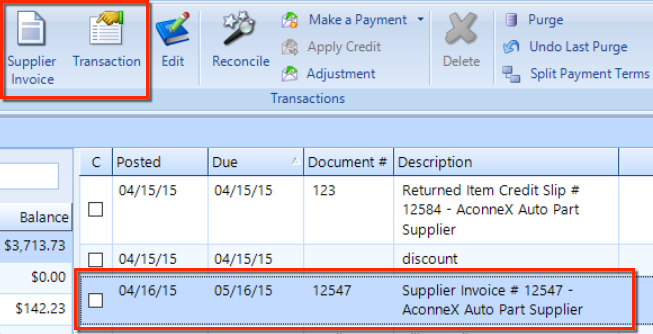
Looking in the Description column for the document type, select a Supplier Invoice or Transaction from the listings in the right window pane, and choose the corresponding button in the ribbon.
Follow these steps to make an adjustment to a transaction:
Click on the Action drop-down and choose Adjustment from the list to open the adjustment popup window.
Choose a Date.
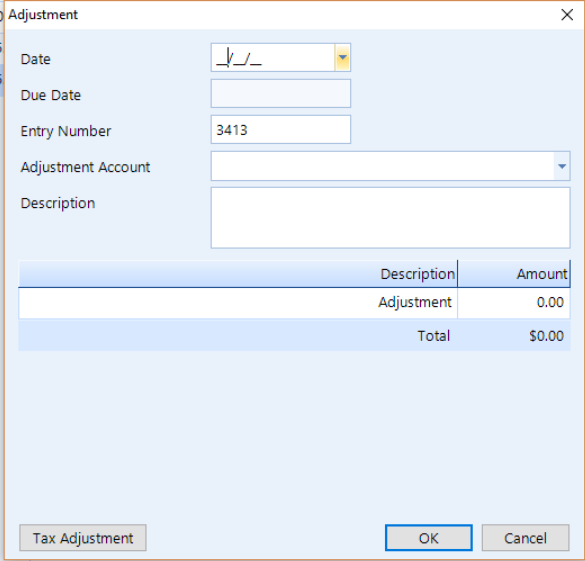
The general ledger will auto-generate an Entry Number, but you may enter in your own if necessary.
From the Adjustment Account drop-down list, select the account on which you want to post your adjustment against.
Describe the adjustment in the Description field.
The Amount Outstanding value is the amount outstanding when taking into account the original transaction and all other related transactions.
Enter the amount of your Adjustment. A positive amount will generate a debit on the payable account (adding to the transaction) and a negative amount will credit the payable account (subtracting from the transaction).
The Total displays the total for the adjustment.
The Amount outstanding after adjustment is the amount of the outstanding when taking into account the original transaction and all other related transactions–including the current adjustment.
| NOTE: Taxes will be calculated automatically on the adjustment amount if the taxes are chosen in the adjustment settings (Setup > Other Charges > Adjustment). If there is no check in that box, taxes are not calculated automatically. |
If you need to adjust taxes or other charges, click the Tax Adjustment button.
Check the box adjacent to any tax or other charge you wish to adjust.
Overstrike the amount in the text box provided.
Click the OK button to save your changes.
Follow these steps to make a payment on a payable account:
Access the Accounts Payable feature, then search for and select a specific payable account (instructions can be found in the sections at the top of this article).
Click the Make a Payment button in the ribbon to open the Make a Payment popup window, as shown in the figure.
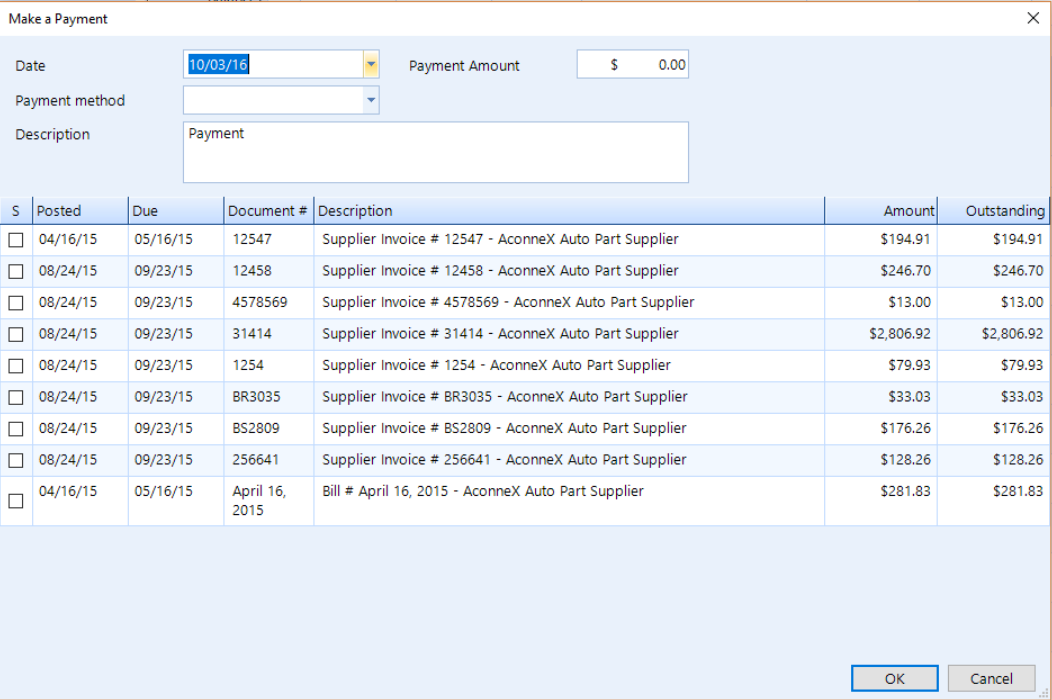
Choose the payment Date.
Enter a Payment Amount, though you can edit the value in this field, typically this value will automatically update as you choose transactions (see the instructions further below).
From the drop-down, choose the customer Payment Method.
Enter a Description for payment, which will appear throughout the entire accounting system.
Select the transactions you wish to pay by checking the box in the S column. The Payment Amount value will reflect the total of all the transactions that have a check in box for this column.
Click the OK button to commit your payment entries.
| NOTE: The payment function does not display credits on the account. It is recommended that payments are made using the Reconcile button. See the section below to learn how to apply a credit. |
Follow these steps to apply a credit to a payable account:
Access the Accounts Payable feature, then search for and select a specific payable account (instructions can be found in the sections at the top of this article).
From the listing, select the transaction to which you want to apply a credit.
Click the Apply Credit button in the ribbon to open the Apply Credit popup window, as shown in the figure.
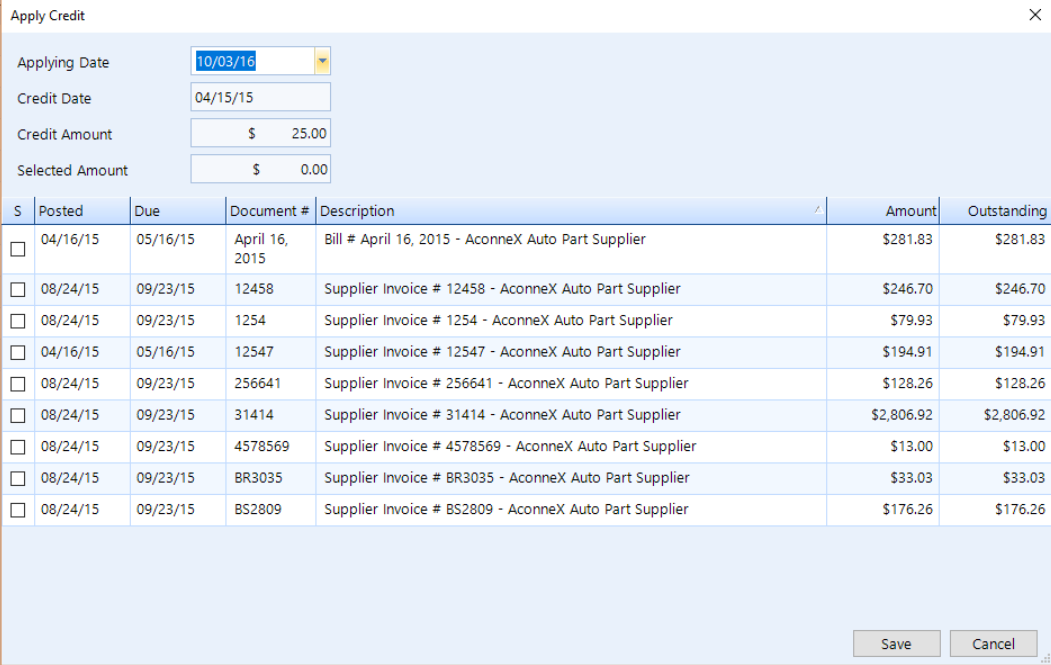
Select an Applying Date, which is the date of record for this credit.
The Credit Date displays the date of the credit you are applying.
Enter a Credit Amount.
The Selected Amount is the total value of transactions chosen in the Transaction List (as we explain in the next step).
Select the transactions for which you want to apply a credit by checking the box in the S column. The Select Amount value will reflect the total of all the transactions that have a check in box for this column.
Click the OK button to commit your changes and apply the credit.
| NOTE: You can only delete transactions that are not system-generated. That is, you may only delete entries that a iser has entered directly into the payable account. |
Follow these steps to delete a payable account transaction:
Access the Accounts Payable feature, then search for and select a specific payable account (instructions can be found in the sections at the top of this article).
Select the transaction from the listing.
Click on the Delete button in the ribbon.
Type "yes" into the field and click OK to confirm the deletion.
Follow these steps to purge a single payable account:
Access the Accounts Payable feature, then search for and select a specific payable account (instructions can be found in the sections at the top of this article).
Click the Purge button in the ribbon to display the payable Purge popup window.
Select a Purge Date – all transactions with zero outstanding amounts and having a post date earlier (and also including) this date will be hidden from the payable account popup.
Click the Continue button
The transactions are now purged. To undo the purge, click the Undo Last Purge button.
Follow these steps to purge all payable accounts:
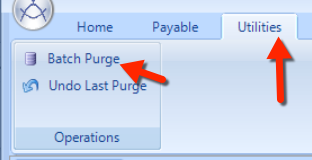
Click the Utilities tab at the top of the Shop Manager window. See the figure below.
Click the Batch Purge button in the ribbon to display the payable Purge popup window.
Choose a Purge Date – all transactions with zero outstanding amounts and having a post date earlier (and also including) this date will be hidden from the payable account popup.
Click the Continue button.
All transactions for this account are now purged. To undo the purge, click the Undo Last Purge command button.
Follow these steps to reconcile a payable account:
Access the Accounts Payable feature, then search for and select a specific payable account (instructions can be found in the sections at the top of this article).
Click on the Reconcile button located in the ribbon. The Reconcile Payable Account popup window opens.
Choose the Payment Date.
Select the transactions you want to be part of this reconciliation by checking the box in the S column. The Selected value will reflect the total of all the transactions that have a check in box for this column.
Use the Find button to locate transactions on the reconciliation popup window (much like the instructions found for finding specific transactions).
The Match function gives you the ability to specify an ending date for included transactions.
Click the Action button to see options for quickly selecting and de-selecting all transactions.
Click the Next button to bring these transactions to the next step.
Check the Automatically Purge box to immediately perform a purge following the completion of the payment transaction.
Select a Payment Date, enter a Payment Amount, and choose a Payment Method.
Click the OK button to perform the reconciliation according to your specifications.