 Customer Contacts
Contacts are where you enter and manage your customers, suppliers and employees. Any person or company that you engage with should be a contact in the Shop Manager. The contacts feature is also where you enter and manager vehicles and service items. Vehicles are automotive vehicles and service items can be anything else that you service or repair.
Watch the following videos as a supplement to reading this article:
To access this feature, click on the Contacts button on the home ribbon.
Login to your enterprise database and click on the Contacts button on the home ribbon.
In this section, you'll learn how to search for contacts and service items.
Follow these steps:
Access Contacts as given in the section above.
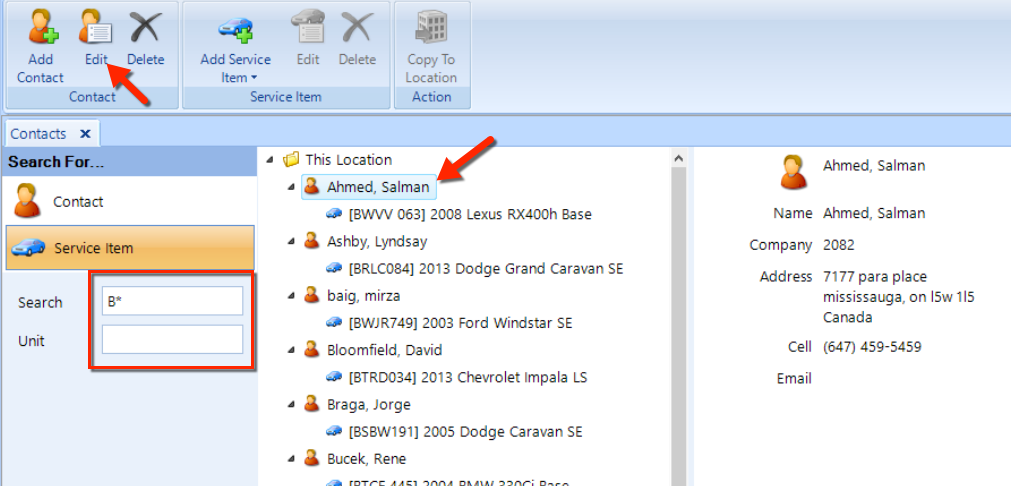
The default method is to search for contacts, as shown in the figure here. You can search for service items by following the instructions in the subsection below.
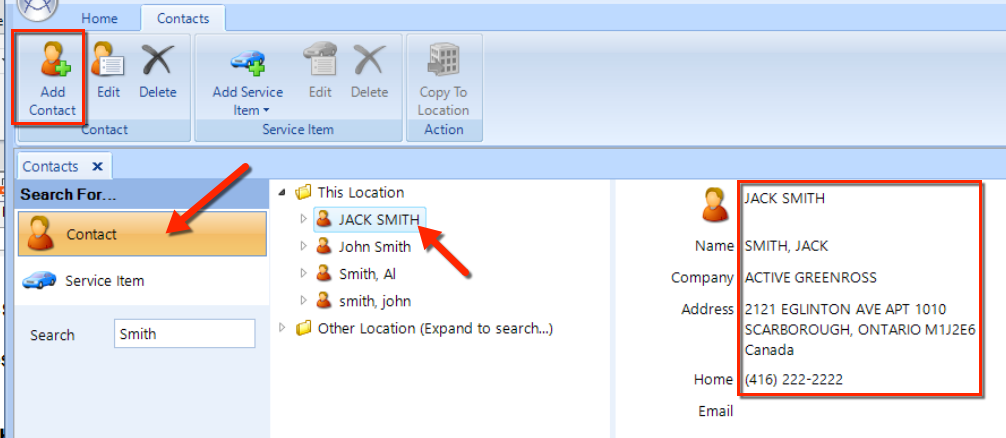
Contacts are searchable by first name, last name, company name, phone number, or e-mail address. Enter the search terms in the Search field and then press the Enter key.
In the middle window pane, review the search results and click on a name in the listing to see the details in the right most panel (as shown in the figure above).
(Enterprise Only) - To check if the contact you searched is in another location, click the Other Location (Expand to search...) node to initiate the search. Contacts matching your search will display under the node. Note: Enterprise contacts will appear in your initial search under This Location and there is no need to expand your search.
If you wish to use the contact (and corresponding vehicles / service items), select the contact and then click the Copy to Location button in the action group of the ribbon.
You can add contacts to your database using the integrated White Pages Pro service. This saves you a significant amount of data entry and speeds up the new customer service routine.
Follow these steps to search for a contact with a reverse phone number lookup:
Access the Contacts feature as given in the instructions above.
Type in a 10-digit phone number into the Search field and press the Enter key.
If the phone number is found in the database, the contact will be displayed as per usual as a search result.
If the phone number is not found in your database, the contact will be appear in a White Pages Pro folder.
If you want to add the contact to your database, double-click on it to edit it and then click the Save & Close button in the ribbon.
Follow these steps:
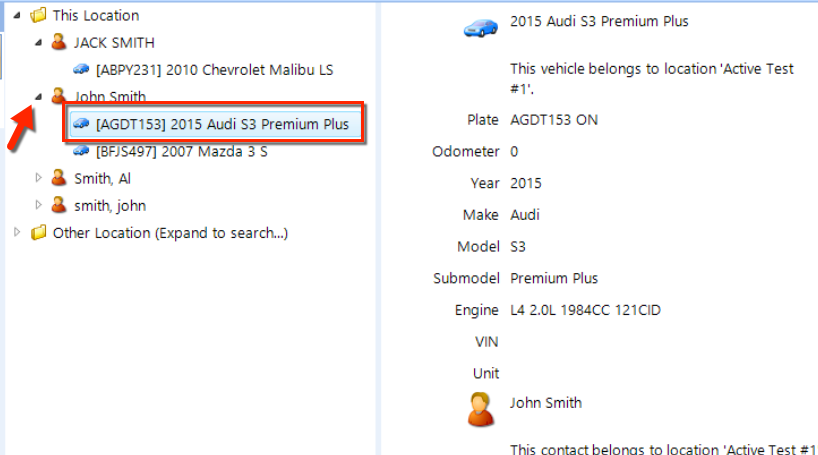
Search for the contact as given in the instructions of the previous section.
Click the arrow on the left of the contact to expand it, as shown in the figure below.
Click on the service item to select it.
Follow these steps:
Access Contacts using the instructions given in the first section above.
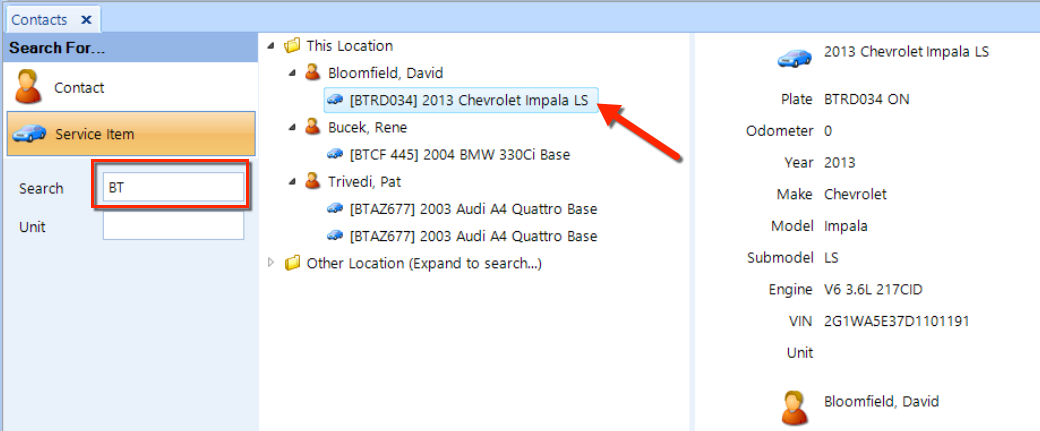
In the left window pane, click on Service Item to select it (as shown in the figure below).
You can search either by plate number or VIN (6 characters minimum) for service item that are vehicles. Enter your Search terms and then press the Enter key.
Enter the full or partial Unit search term and then press the Enter key. If you enter the contact name in the Search field and the unit ID in the Unit field and the results will yield only matching units for the contact.
You can combine terms in both the Search and Unit fields to make your search more restrictive.
In the middle window pane, click on a service item in the search listing and then view the details in the rightmost window pane as shown in the figure below.
Follow these steps to add or edit a contact:
Access Contacts using the instructions given in the first section above.
To add a new contact, click the Add Contact button in the ribbon.
To edit or view an existing contact, use the Search instructions given in the previous section.
Once you find the contact you wish to edit in your search results, select it by clicking on it and then click the Edit command button in the Contact group on the ribbon.
(Enterprise Only) If the contact is an enterprise contact, it will read "This contact belongs to the enterprise" in the bottom left corner of the contact dialog. If the contact can only be edited at the enterprise, the check box saying so will be checked and all the fields will be greyed out not allowing any editing.
To move the ownership of a contact from one location to another or assign it to the enterprise, click the Move To button in the actions group of the ribbon. Select the location from the drop down list and then click the OK button.
Smart Labels – specially marked fields will provide options for you to choose the field label, and the "smart fields" have been configured in setup. These fields appear with dark blue highlighting, and some of these smart labels, when click, will display a popup window or drop-down that provides another option for data entry.
The system will automatically fill in the File As field as you enter the name. You can use the drop-down in this field to change the way it is filed. This is the title that will appear in all contact listings. Personal contacts tend to appear in listings in a "last name, first name" format, while business contacts tend to be appear by company name.
If this is a business contact, enter the Company name.
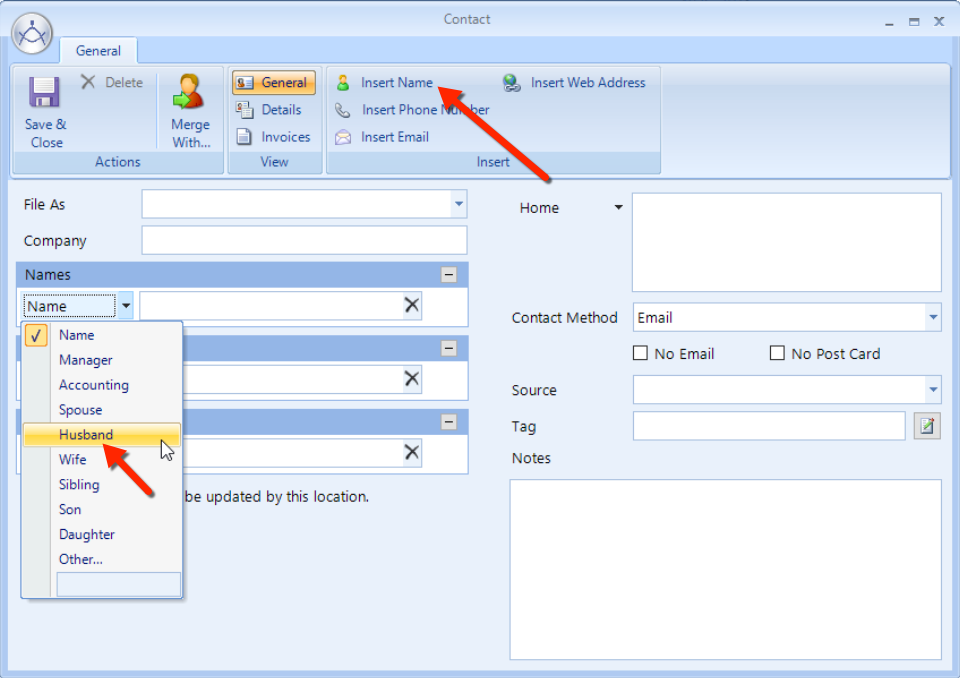
Name – Enter a personal name for the contact. Optionally, click the label drop-down to choose a different label for this name (as shown in the figure below). Insert additional names for this contact by clicking the Insert Name button in the ribbon, as shown in the figure.
Phone Numbers – Here, you can enter one or more phone numbers for the contact. Click the Home label drop-down to choose another label, such as Business. Then, enter the phone number in the field. Insert additional phone numbers by clicking the Insert Phone Number button in the ribbon, as shown in the figure.

Emails & URLs – Here, you can enter an email address or URL for the contact. Click the Email label drop-down to choose another label, such as Webpage/Site. Then, enter the URL or email address in the field. Insert additional email addresses/URLs by clicking the Insert Email button in the ribbon, as shown in the figure.
| NOTE: The best way to enter an address is to click on the Home label, and another window will appear in which you can enter the address and ensure that has the proper formatting. Remember to choose which label you want for the address. |
Enter the Address for the contact, and optionally choose a different label from the drop-down. If you click on the label a window will open and provide a dialog that divides the address fields insuring proper formatting.
Choose the Contact Method from the drop down list. See the figure below.
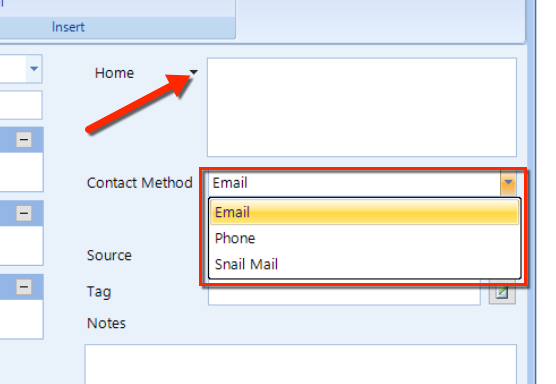
Check the No Email box if you do not want this contact to receive email messages from the CRM system.
Check the No Postcard box if you do not want this contact to receive postcards from the CRM system.
In the Notes field, enter any additional information about the contact. These notes are for internal use only, and will not appear on any customer documentation.
(Enterprise Only) - If you only wish to have this contact updated by the enterprise only, check the This contact can only be updated by the enterprise check box.
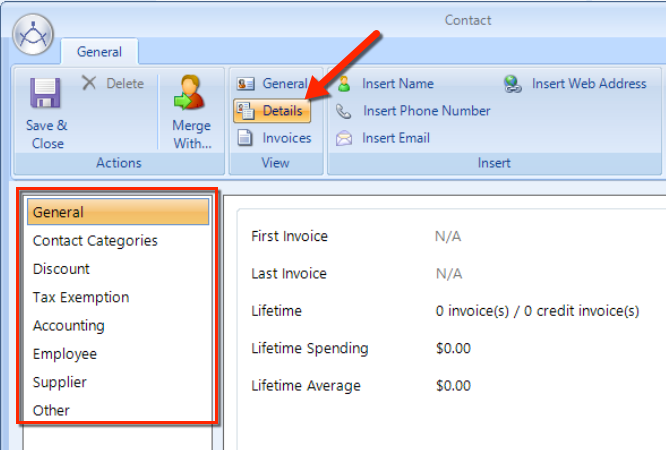
To continue adding details for this contact, click the Details button in the ribbon and follow the instructions below.
You can add many more details to a contact, such as contact categories, accounting, employee and supplier settings. Add these details at any time, either during the creation of a contact or at any future time that you need to edit this contact.
To add contact details, search for a contact, open it, click the Details button in the ribbon to view the details pane, as shown in the figure below. Then, follow the instructions for each detail category in the sections below.
(Enterprise Note) - Not all Details are available at the enterprise level. Those that are not will only be available at individual locations.
Follow these steps to view or edit these details:
Click on the General item in the left window pane to view general details about this contact.
First Invoice is the date on which the first invoice posted to the contact.
Last Invoice is the date on which the last invoice posted to the contact.
Lifetime is the number of invoices and credits that have posted to the contact.
Lifetime Spending is the dollar amount the contact purchased since the first invoice.
Lifetime Average is the average invoice value since the first invoice.
Click the Rebuild button to recalculate the values if they don't appear to be correct.
Follow these steps to view or edit these details:
Click on Contact Categories in the left window pane to display the contact categories in the right window pane.
Click the box beside each category in which you want to include this contact. Uncheck the box of any category Conversely, If a category is selected, you can click on it to remove the contact from that category.
Follow these steps to view or edit these details:
Click on Discount in the left window pane to display the discount details in the right window pane.
Enter a percentage discount in the Labor Discount field.
Applies to already discounted service packages: check this box if you want the discount to apply to discounted labor lines that have been configured on concerns, inspections, or service packages.
Material Price Level: from this drop-down list, choose an inventory material price level for the contact. If you choose nothing from this list, the default price level will apply to this contact. The assigned inventory material price level will not override any material items that are set to fixed pricing. Note that this material price level only applies to materials sold from inventory. The sell price for items received directly on to work orders are determined by the margin matrix.
Enter a percentage discount in this field. If you selected a material price level in the parameter above any discount will be on top of the level.
Applies to already discounted service packages: check this box if you want the discount to be applied to discounted material lines configured on concerns, inspections, or service packages.
Follow these steps to view or edit these details:
Click on Tax Exemption in the left window pane to display tax exemption details for this contact in the right window pane. When creating a new contact, these details will be blank.
Click the Action drop-down choose Add to add a new exemption to the list.
In the popup window, choose the Tax type from the drop-down, enter the Exemption # for the contact, and also enter a Note to further describe the exemption for internal reference.
For an exemption that already exists, you can choose Edit from the Action drop-down to modify the exemption.
Choose Delete from the Action drop-down to remove the exemption.
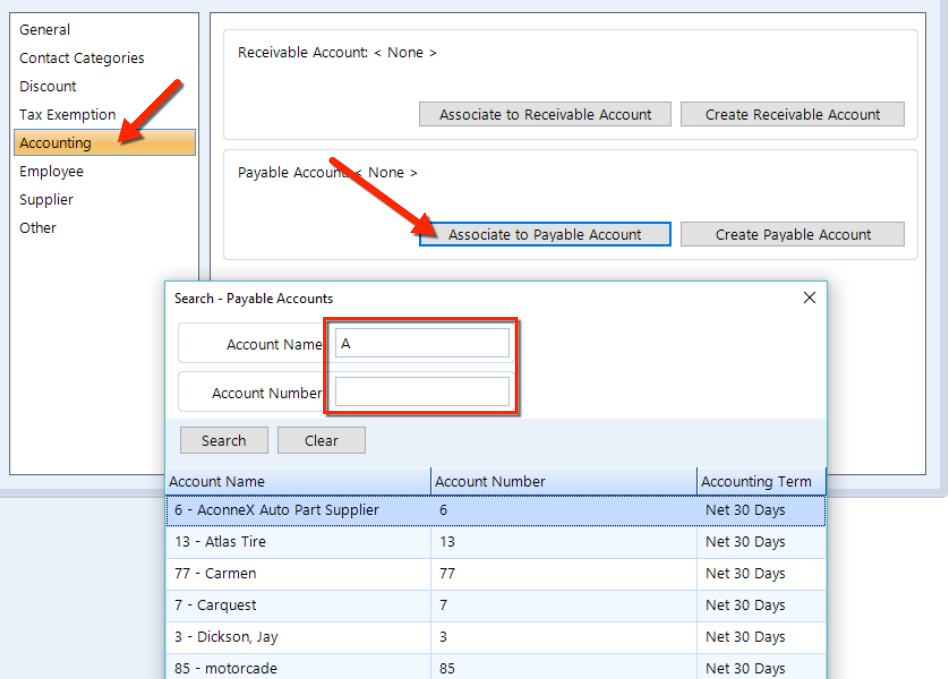
Click on Accounting in the left window pane. to display the accounting details in the right window pane, in which you can configure payable and receivable settings for the contact. See the sections below for instructions on editing these details.
With Shop Manager, you can post the purchase transactions for multiple contacts to a single payable account. For example, you may have a supplier that has multiple locations, and you purchase items from more than one of their locations. If the supplier sends you a consolidated statement from the supplier head office, then this feature is especially useful. You can create a contact for each supplier store location, and also a contact that corresponds to the head office. You can follow the instructions below to create a payable account for the head office contact, and also associate each of the store contacts with the head offices payable account.
Follow these steps to choose a payable account for a contact:
Click on the Associate to Payable Account button.
Search for the payable account you wish to associate by entering full or partial terms in the Account Name and / or Account Number fields, and then clicking the Search button.
Select the payable account from the resulting list by clicking on it.
Click the OK button to associate the account.
Follow these steps to create a payable account for a contact:
Click on the Create Payable Account button.
Enter the Account Name, which defaults to the contact name. Change this name, if necessary.
Enter the Account Number given by your supplier, or use the system generated number.
(Enterprise Only) - Select from the Managed By drop down list if the account will be managed by the location or the enterprise.
Enterprise: If you reconcile the account at the enterprise then you would manage it at the enterprise as all the transactions from the selected locations will consolidated at the enterprise.
Location: If you reconcile the account at the individual locations then you would manage it at the location.
Accounting Term: from the drop-down, choose an accounting term for the account.
Click the Save button to save and close the popup window.
After associating a contact to an account (using either method given above), you can later disassociate the account from the contact, if necessary.
Follow these steps to disassociate a payable account from a contact:
Click on the Disassociate Payable Account button.
Disassociate and keep current Payable Account: check this box to disassociate the payable account from the contact but retain the payable account.
Deactivate the Payable Account: check this box to disassociate the payable account from the contact and also deactivate the payable account.
Once you have associated an account to a contact or create an account to associate with a contact, you can later edit the account settings and manage any contact associations by viewing and/or deleting. You can also add new contacts to associate with the account.
Follow these steps to manage payable account settings from within the contact window:
Click on the Payable Account Settings button, as shown in the figure below.
As necessary, edit any other account settings by clicking the items in the left window pane.
Click the Associated Contacts tab to display a list of currently associate contacts.
If necessary, click the Add button to add a contact and associate the contact with the payable account, following the instructions given at the top of section.
Otherwise, create or find the contact and then double click on it.
To delete a contact, select the contact that you need to disassociate with the account by clicking on it and then clicking the Delete button.
(Enterprise Only) - Click on the Location tab to modify the locations at which the payable will be available.
By default, all locations will be listed.
To delete a location from the list, select it and then click the Action button and select the Delete option.
To add a location to the list, select it and then click the Action button and select the Add option.
Click the Save button to commit your changes and close the popup window.
With Shop Manager, you can post the purchase transactions for multiple contacts to a single receivable account. For example, you may service a fleet that has multiple locations or individual drivers and you want to maintain each location or driver as a separate contact. You can arrange for each of those contacts to charge to a single receivable account, and create a contact for each location/driver and also one for the head office. For the head office contact, you can create a receivable account (see the instructions below) and +also associate each location or driver contact to the head office receivable account.
Follow these steps to choose a receivable account for a contact:
Click on the Associate to Receivable Account button.
Search for the receivable account that you want to associate by entering full or partial search terms in the Account Name and / or Account Number fields, then click the Search button.
Select the receivable account from the listing by clicking on it.
Click the OK button to associate the account with the contact.
Follow these steps to choose a receivable account for a contact:
Click on the Create Receivable Account button.
Enter the Account Name, which defaults to the contact name. Change this name, if necessary.
Enter the Account Number that you want to assign, or use the system generated number.
(Enterprise Only) - Select from the Managed By drop down list if the account will be managed by the location or the enterprise.
Enterprise: If you generate a consolidated statement of the account at the enterprise then you would manage it at the enterprise as all the transactions from the selected locations will consolidated at the enterprise.
Location: If you generate statements of the account at the individual locations then you would manage it at the location.
Accounting Term: from the drop-down, choose an accounting term for the account.
Enter the Account Limit.
Enter the Service Charge Rate as a monthly percentage that you will use to calculate service charge fees for late payment.
From the drop-down list, choose the Statement Option that corresponds to how you want the statement to be delivered.
From the drop-down list choose a Statement Address that will appear on the statement.
Choose the Statement Email address to which the statement will be sent.
Click the Save button to commit your changes and close the popup window.
After associating a contact to an account (using either method given above), you can later disassociate the account from the contact, if necessary.
Follow these steps to disassociate a payable account from a contact:
Click on the Disassociate Payable Account button.
Disassociate and keep current Receivable Account: check this box to disassociate the payable account from the contact but retain the payable account.
Deactivate the Payable Account: check this box to disassociate the payable account from the contact and also deactivate the payable account.
Once you associate an account to a contact, or create an account to associate with a contact, you can later edit the account settings and manage any contact associations by viewing and/or deleting. You can also add new contacts to associate with the account.
Follow these steps to manage receivable account settings from within the contact window:
Click on the Receivable Account Settings button, as shown in the figure below.
As necessary, edit any other account settings by clicking the items in the left window pane.
Click the Associated Contacts tab to display a list of currently associate contacts.
If necessary, click the Add button to add a contact and associate the contact with the payable account, following the instructions given at the top of section.
Otherwise, create or find the contact and then double click on it.
To delete a contact, select the contact that you need to disassociate with the account by clicking on it and then clicking the Delete button.
(Enterprise Only) - Click on the Location tab to modify the locations at which the receivable will be available.
By default, all locations will be listed.
To delete a location from the list, select it and then click the Action button and select the Delete option.
To add a location to the list, select it and then click the Action button and select the Add option.
Click the Save button to commit your changes and close the popup window.
Follow these steps to designate a contact as an employee:
Click on Employee in the left window pane to display the employee details in the right window pane.
To designate a contact as an employee, click on the Change Employee Settings button.
Check the Employee box to designate the contact as an employee, as shown in the figure.
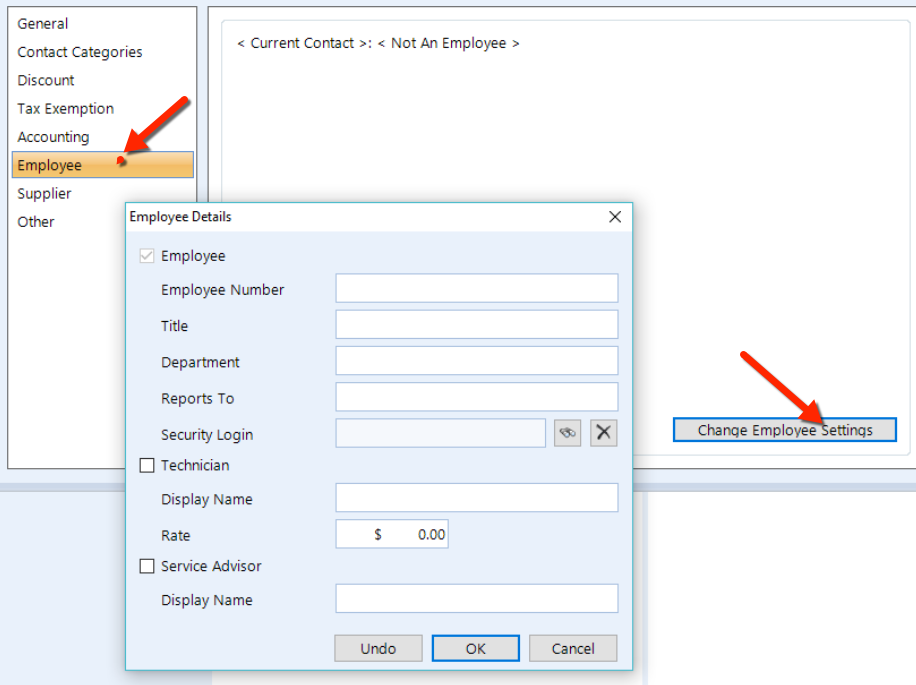
Enter the Employee Number, employee Title , and employee Department.
In the Reports To field, enter the employee supervisor.
The Security Login field can link the contact to a contact in the security system. To choose a security system contact, click on the small search button (binoculars)) to open the search popup window, then enter full or partial search terms in the Name field, and then click the Search button. Choose a contact from the user listing, by clicking on it and then click the OK button.
Check the Technician box to designate the contact as a technician.
Rate: If you want to cost labor on work orders and reporting, enter the cost rate per hour for the technician.
| NOTE: If you enter a rate for one or more technicians, then you will need to enter a rate for ALL technicians. Otherwise, your reporting will be inaccurate. |
Check the Service Advisor box if the contact is a service advisor.
Enter the Display Name for the contact that you want appear on work orders, work-in-progress listings, and any technician reporting.
Follow these steps to manage supplier settings for a contact:
Click on Supplier in the left window pane to display the supplier settings in the right window pane.
Click on the Change Supplier Settings to make the contact a supplier if it isn't or to edit existing settings.
Enter a value in the Credit Limit field that represents the amount you can charge to your account with the supplier.
Enter a Note about the supplier. This note is internal only and will not appear in external documents.
Check the Support Online Order box if the supplier supports online connections.
In the Type tab, check each box that you want to appear in the filter drop-down lists throughout Shop Manager.
Part - If you purchase materials for resale either directly on a work order or for inventory replenishment.
Sublet - If you sublet jobs to this supplier.
Warranty - If this supplier allows warranty claims.
General - If you purchase expense type items from the supplier. An example would be the phone company.
In the Supplier Connection Setting tab, select a Connection Type from the drop down list, then enter the parameters that are necessary to establish a connection. Some connection types will require help from your representative.
In the Catalog Settings tab, choose a Catalog Type from the drop-down list, then enter the parameters that are necessary to establish a connection. Some connection types will require help from your representative.
Click OK to commit your changes and close the popup window.
If you change any contact information and you want to save your changes, click the Save & Close button in the ribbon. As you close the popup, any unsaved changes will cause a prompt to appear. Click Yes, No, or Cancel.
Service Items are either automotive vehicles or a generic service item for anything else. The software will run any materials and labor based business so a service item can be anything from equipment to an appliance.
Follow these steps to manage a service item for a contact:
Access contacts using the instructions above.
To edit an existing service item, search for a either contact or service item as given in the instructions above.
Click the Edit button in the ribbon, as shown in the figure.
If adding a new service item, search for a contact as given in the instructions above.
In the ribbon, click the bottom portion of the Add Service Item drop-down button. Alternatively, if you're adding a vehicle click the top portion of the button.
Select either Add Vehicle or Add Service Item and then follow the instructions in the appropriate section below.
Follow these steps to when adding or editing a vehicle:
Enter the Plate number of the vehicle. If you subscribe to CARFAX, you can then click the Search button at the right of the plate field to use the plate to VIN decoder option. If a match is found the year, make, model, and engine fields will populate automatically. See the figure below for an view of the Vehicle popup window.
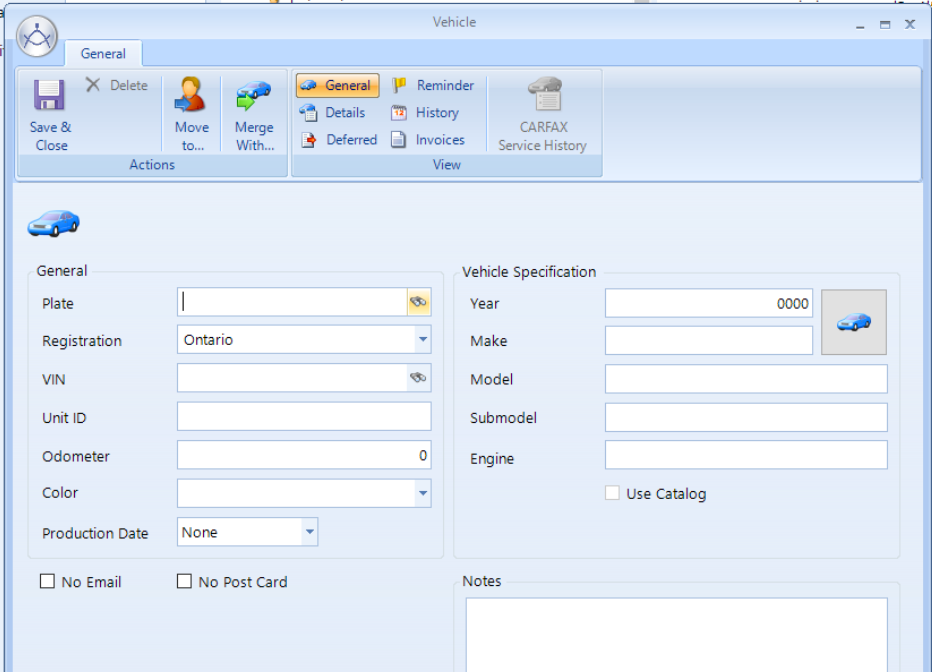
Choose the state or province for the plate registration drop-down, which contains the values that have been setup for smart labels. You can also manually enter the abbreviation for the state or province.
Enter the VIN (Vehicle Identification Number) of the vehicle in the provided text box. You can then click the small Search button at the right of the VIN field to use the VIN decoder option. This will fill in the year, make, model, and engine information fields explained below automatically.
Unit ID - Enter in the text the customer uses to identify the vehicle in the provided text box. These are typically assigned by fleet customers to identify the vehicles with their fleet.
Odometer - Enter the mileage of the vehicle in the provided text box.
Color - Enter the color of the vehicle in the provided combo box. This list is populated with the values you entered in the smart labels setup dialog.
Production Date - Select the date the vehicle was produced from the calendar.
Click the small vehicle button to choose and populate the Year, Make, Model, Submodel, and Engine fields.
The Use Catalog box has a check by default. If you uncheck this box, then you can then enter any value for the Year, Make, Model, Submodel, and Engine fields. In so doing, however, you lose the ability to use any electronic cataloging to look up parts and labor.
Click to see vehicle specifications: Shop Manager uses several different catalogs, and supports the ACES specification. Vehicles are stored first this specification, but will cross-reference that standard to other catalogs as necessary when they do not support the ACES standard. Click on this link to open the vehicle specifications popup, in which you can edit any specific conditional questions you may have answered when looking up parts or labor.
If you do not want the contact for this vehicle to receive email messages from the CRM system, check the No Email box.
If you do not want the contact for this vehicle to receive postcards from the CRM system, check the No Postcard box.
Enter any internal Notes, which do not appear on any customer documentation.
Follow these steps when adding/editing a service item:
Enter text in the Lookup field that you want to use to retrieve the service item going forward.
Enter a numerical value in the Usage field that represents the usage of the item if applicable. For equipment, this value could represent hours of usage.
Enter a Description of the service item.
Choose a Production Date, which is the date the service item was produced.
If you do not want the contact for this vehicle to receive email messages from the CRM system, check the No Email box.
If you do not want the contact for this vehicle to receive postcards from the CRM system, check the No Postcard box.
Enter any internal Notes, which do not appear on any customer documentation.
If the vehicle or service item is access at the enterprise, it will read "This vehicle / service item belongs to Location *****" in the bottom left corner of the dialog. To move the ownership of a item from one location to another or assign it to the enterprise, click the Move To button in the actions group of the ribbon. Select the location from the drop down list and then click the OK button.
View additional details about the service item by clicking the Details button in the ribbon.
Follow these steps to view or edit these details:
Click on the General item in the left window pane to view general details about this service item.
First Invoice is the date on which the first invoice posted to the service item.
Last Invoice is the date on which the last invoice posted to the service item.
Lifetime is the number of invoices and credits that have posted to the service item.
Lifetime Spending is the dollar amount purchased for this service item since the first invoice.
Lifetime Average is the average invoice value for this service item since the first invoice.
Click the Rebuild button to recalculate the values if they don't appear to be correct.
Follow these steps to view or edit these details:
Search for the contact or service item given in the instructions above.
Click the service item and then click the Delete button in the ribbon.
Double-click service item to open the popup window and then use the buttons in ribbon to view service History and Invoice history.
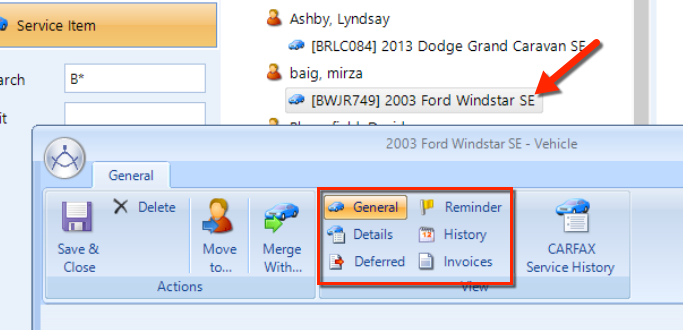
Double-click service item to open the popup window and then click the Deferred button to view the work items that have been deferred for this service item.