 Inspections &
Inspection Results
Inspections &
Inspection ResultsInspections are check lists that provide the technician a method to report the status of the vehicle components and make comments for each item on the list. Completing standard Inspection checklists is a good method to achieve consistency in reporting from all technicians, and they are also great tools for determining diagnostic charges.
Before reading this article, consider watching this video:
Inspections &
Inspection Results
To access the Inspection feature in setup, click on the Setup command button in the Home ribbon, then click Work Order Setup > Inspections in the left window pane.
To add or edit a concern, follow these steps:
Access Inspections in Setup, as shown in the section above.
To add a new inspection, click the Add command button in the ribbon.
To edit an existing inspection:
Select a Profit Center from the drop-down.
Select a Service Category from the drop-down.
Optionally, type in a full or partial Code that the concern contains.
Optionally, type in a full or partial Title that the concern contains.
Click the Search command button in the search group of the ribbon.
Click on the inspection you wish to edit in the list and then click the Edit command button in the ribbon, or simply double-click the inspection.
As you edit the concern, you can click Save to commit any changes, click Cancel to exit without saving any changes, and click Undo to discard all the changes you made since the last save.
From this drop-down, choose a profit center and service category for the inspection.
Optionally, enter any text that you want to use to further define or group the inspection. For more information about codes, read the common uses for codes topic.
The time entered in this text box is used to calculate the work order when the labor line still has a lookup required status.
To edit the header of the inspection, click the Edit Header command button on the service package group of the ribbon.
Title - Enter a concise yet descriptive title of the inspection in this field. This title will appear on any inspections listings, including what the service advisor sees when adding inspections to a work order.
Description - Enter a description of the inspection in this field. Typically, the description of the inspection elaborates on the title, but many shops choose to include questions they want the service advisor to ask the customer to collect all necessary information for the inspection.
Footer
The footer consists of a title and description. To edit the inspection footer, click the Edit Footer button on the ribbon. Typically, the footer highlights an important note about the inspection.
Title - Enter a concise yet descriptive title of the inspection in this field. The footer title appear in bold type below all of the material and labor items on the inspection.
Description - Enter a description of the inspection in this field. Typically, the description elaborates on the footer title.
To add a new labor line to the concern, click the Add Labor Line button in the Service Package Line group of the ribbon.
Click OK to save your changes and return to the inspection editor.
To add a new material line to the concern, click the Add Material Line command button in the Service Package Line group of the ribbon.
Click OK to save your changes and return to the concern editor
To add a new sublet line to the concern, click the Add Sublet Line button in the Service Package Line group of the ribbon.
Click OK to save your changes and return to the concern editor.
To Edit a line item, click on it to select it and then click the Edit Line command button in the Service Package Line group of the ribbon. Once the editor opens, edit the line item using the Add Labor Line, Add Material Line or Add Sublet Line instructions.
To delete a line item, click on the line item and then click on the Delete command button in the Service Package Line group on the ribbon.
There are a number of buttons at the top of the Inspection tab, which we explain here.
In the popup window, you'll find these options:
Add puts the inspection line at the bottom of the inspection list
Insert puts the inspection line directly above the line item you've chosen.
Header - check this box to change the line item from an inspection item to a header, so that you can divide the inspection into sections separated by headers.
Title - enter a title that describes the focus of the inspection (or the name of the header).
Notes - enter any additional notes about the inspection. This is also where the technician will record any comments about the item.
Select the line item you need to edit and then click the Edit Inspection Line button in the ribbon.
Select the line item you need to delete and then click the Delete Inspection Line button in the ribbon.
The figure below shows an example of a cooling system inspection for automotive repair and diagnostics.
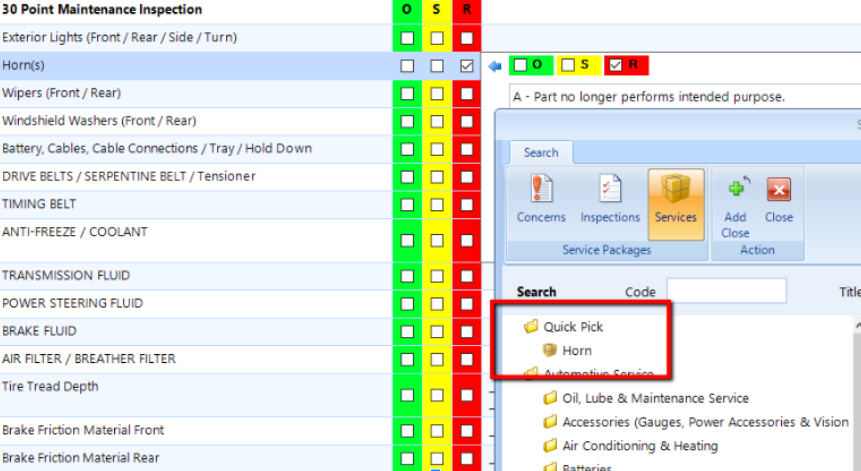
Each inspection line may include a list of Quick picks. Quick picks are service packages that are associated with a given inspection line and will be listed first when the user adds service packages to the work order from the inspection screen.
To add quick picks, do the following:
Navigate to the Inspection tab.
Select the applicable inspection line, such as Horn(s).
Click the Edit Quick Pick button in the ribbon.
Click Add.
Search the applicable service category and use keywords to narrow the search result, as necessary.
Choose a service package, or choose multiple service packages by holding down CTRL while making selections that relate to inspection line, such as Replace Horn.
Click OK.
When the user is reviewing the inspection tab of an active work order and decides to add a service package, the quick pick service packages corresponding to the inspection line appear first. See the figure below.
In the Related tab, you can assign inspections and services that are either put on the work order in addition to the concern or replace it entirely. How the related items behave is established in Service Package Relationships.
Follow these steps to add a relationship:
Either click the Add Inspection or Add Service Package command button in the ribbon to open a popup.
Choose a Profit Center from the drop-down.
Choose a Service Category from the drop-down.
Optionally, enter a full or partial Code to filter your search results.
Optionally, enter a full or partial Title to filter your search results.
Click the Search button.
Select an inspection or service package from the list.
Click OK to view the relationships in the Service Package Relationships popup.
Select the relationship you wish to use by clicking the box next to it and click OK.
The relationship is now established.
To delete a relationship, choose it from the list and click the Delete Related button in the ribbon.
To delete a concern, do the following:
Access Concerns using the steps in the first section of this article.
Select a Profit Center from the drop-down.
Select a Service Category from the drop-down.
Optionally, enter a full or partial Code that the inspection contains.
Optionally, enter a full or partial Title that the inspection contains.
Click the Search button in the ribbon.
In the list, click on the inspection you want to delete and then click the Delete button in the ribbon.
The triggers tab is a supplement to the reminder items setup, and will list any reminder items for which the presence of the inspection or service package on a work order will trigger a reset of the reminder.
For reminder items, there are two ways to add a service package or inspection as a trigger to reset that item. The first is through the reminder items setup, which is explained in Reminder Items Setup. The second is through this triggers tab–directly from an inspection or service package setup. The second method is typically used when creating a brand new inspection or service package which needs to trigger the reset of a specific reminder item–such as the creation of a brand new oil & filter service offering. The oil & filter service reminder should be reset any time that an oil & filter related service package is completed on a work order. As such, it would be appropriate to add the new service package as a trigger of the oil & filter reminder.
To add the inspection or service package as a trigger for a reminder items, complete these steps:
Click the Add Reminder Item button in the ribbon.
Search for the reminder item for which the occurrence of the inspection or service package triggers a reset.
Select OK.


 button on the right hand side of the
dialog to manage the
button on the right hand side of the
dialog to manage the  button.
 next
to the tag in the list.
next
to the tag in the list. Click
the inventory search button if you wish to link the material item
to an inventory item. This can save time on the work order if
the same inventory item is used every time for this application.
Click
the inventory search button if you wish to link the material item
to an inventory item. This can save time on the work order if
the same inventory item is used every time for this application. search binoculars. If you wish to remove
an existing definition click the
search binoculars. If you wish to remove
an existing definition click the  If you set the definition for the material item
on the General tab then you do not need to set the Lookup Criteria
as it will automatically be populated.
If you set the definition for the material item
on the General tab then you do not need to set the Lookup Criteria
as it will automatically be populated.