 Inventory Part
1 Setup
Inventory Part
1 SetupInventory materials are items that you stock for resale. Many day-to-day inventory management functions are available in the Utilities module, which offers a full array of functions for managing inventory.
Proper inventory setup is essential for accurate, day-to-day management of your inventory. By taking time to setup inventory correctly, you'll enjoy more consistency, accuracy, and overall efficiency in managing your inventory. The guidance given in this article assumes that Inventory Setup has already been done.
Consider watching these videos as a supplement to reading this article:
In this article, we explain how to perform these tasks:
Search, edit and add inventory
Return inventory
Recount inventory
Inventory reorder
Handle inventory batches
Update inventory pricing
You access the Inventory module by clicking Utilities > Inventory in the ribbon.
Some tasks, such as deletion of an inventory item, must be done through Setup. Click Setup in the ribbon and then click Inventory Setup > Inventory Material in the left-hand menu. If you are unfamiliar with inventory setup, please begin with the Inventory Setup section of the help.
There are several ways to search for inventory items. After accessing the Inventory Materials window as we explain above, you can specify filters, enter search terms, and then click the Search button in the ribbon.
In the subsections below, how to search for inventory items using realistic examples.
| Start a new search: To begin an entirely new search at any time, simply click the New Search button in the ribbon to clear the filters and search results. |
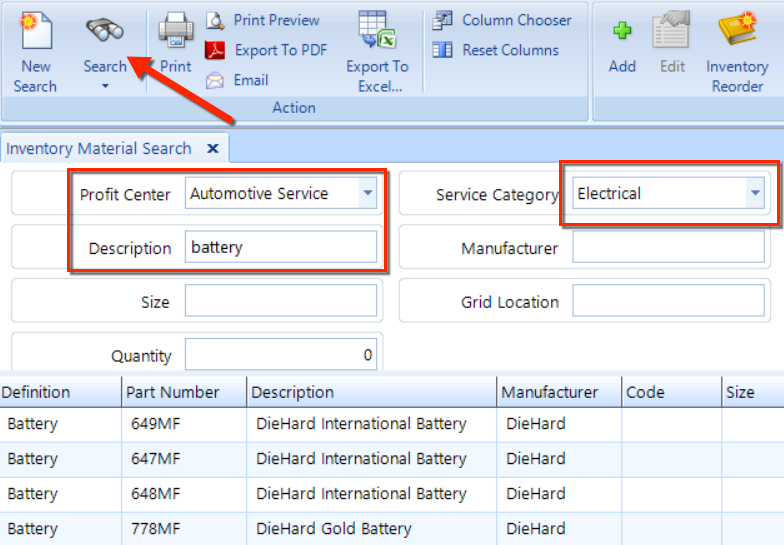
Follow these steps to search for all batteries within the Electrical service category in the Automotive Service profit center:
Access the Inventory Materials module, as we explain above.
Choose Automotive Service from the Profit Center drop-down.
Choose Electrical in the Service Category drop-down.
To retrieve all the batteries, enter "battery" in the Description field.
Click the Search button in the ribbon at the top.
| Search for items with zero quantity: The default Quantity has a value of 1. To include items that have zero quantity, change the value to 0. |
After following the steps above, your results should look similar to what we have in this figure:
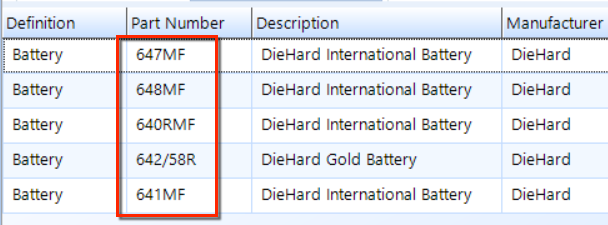
Let's say that you want to search for a battery and all that you can remember is that the part number begins with "64". Here's how you can easily locate that item:
Access the Inventory Materials module, as we explain above.
Choose Automotive Service from the Profit Center drop-down.
Enter "64" in the Part Number field.
Click the Search button in the ribbon at the top to get results similar to what we show in the figure below.
It's easy to edit an existing inventory item. Continuing with our example, let's edit one of the battery items from the results in the search above.
Follow the steps in Search by Part Number section above.
Double-click on the item which has a part number of 647MF.
To edit Information for the inventory item, click on any of the four tabs General, Pricing, Batch, or History. See the figure below.
You can change the value of the field in white. (Grey fields are not available for editing.)
If you want to revert to the values prior to your changes, click the Undo button.
Click Save to commit your changes.
As we explain in the sections below, you can receive, recount, and return an item.
To add an item to inventory in Shop Manager, access the Inventory Materials module and click the Add button. Enter the information for the item, much like the steps give in the edit section above.
There is a comprehensive Purchasing/Receiving module in Shop Manager, from which you can create purchase orders and subsequently receive items from those purchase orders. Also, you can receive inventory items from a purchase order that has been created using the Inventory Reorder feature.
There may be times when you want to receive an item directly from within the Inventory Module. This feature is particularly useful if you have parts department staff that manages inventory without generating purchase orders–since they may simply receive items as they arrive on-site.
To receive a material item into inventory, follow these steps:
Search for the item you need to receive, as we explain in the Search by Part Number section above.
In the Inventory Material window for part number 647MF, click the Receive button. See the figure below.
Note the Unit value, and use it as a guide to enter the correct Quantity that you are receiving. Consider the case in which the Unit is a 6-pack. If you are receiving 6 individual items, then you would enter a value of 1 in the Received field.
If you are returning some of the items you are receiving, enter the amount in the Returned text box. Any items that you return will appear in the Returned Items folder for this supplier.
If necessary, update the values for the MSRP, MSRP Core, Cost, or Core.
Confirm the Supplier is correct, and enter the Invoice Number.
Update Inventory MSRP – Check this box if you want to update the system MSRP value for this item with a new value that you may have entered into the MSRP field. The default setting for this check box can be set in the Inventory Defaults.
Update Inventory Cost – Check this box if you want to update the system inventory cost value for this item with a new value that you may have entered in the Cost field. The default setting for this check box can be set in the Inventory Defaults.
Click the OK button to commit your changes and receive the item(s).
To receive additional items, close the Inventory Material window and repeat the steps above on each of those items.

If you receive excess items, or you need to return some items, click the Return button in the Inventory Material window and then enter the number of units you are returning in the Return Quantity field. Confirm that you want to return the items, and click OK to close the popup window.
Return items while receiving: To see how to return a quantity of items, review the first few steps in the Receive Materials section above. In the example given there, the Unit is a 6-pack. Let's say, in that case, that two six-packs came in the shipment and you want to return one of them. Simply enter a value of 1 for in the Returned field.
The history of the item can be useful for auditing. You'll find a record of any significant inventory event here, such as receiving, selling, recounts, or returns. The detailed provided includes the date of the transaction, the action (purchase, recount, return or sale), the quantity, unit cost, unit core, total cost and total core.
To view the history, simply click the item in the search results. Then click the History tab in the Inventory Material window. Restrict the history listing by changing the Start and/or End dates, then click the Refresh button.
In the Notes column, there may be a reference to a supplier invoice or other document. Double-click the item to see this invoice.
At any time, you can recount the items that are actually on-hand and update the actual quantity for an item in the system. You can also use this feature to establish your initial stock when you are adding a new inventory item.
It's easy to record a recount value. Continuing with battery item example from the sections above, follow these simple steps:
Follow the steps in Search by Part Number section above.
Double-click on the item which has a part number of 647MF.
Click the Recount command button in the ribbon of the Inventory Material window.
In the Inventory Recount popup, most of the fields will contain values. Current values are on the left and fields for entering new values are on the right.
Enter the actual quantity on hand in the Actual Quantity field, and optionally enter new values for and Per Unit Core.
Click the OK button to commit your changes and process the recount.
To receive additional items, close the Inventory Material window.

NOTE:
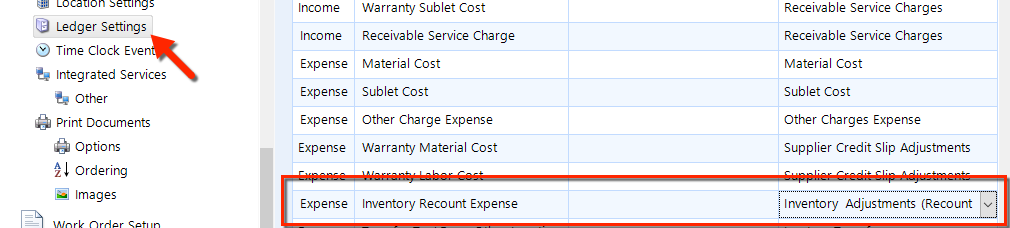
The accounting implication of an inventory recount will
either be a gain or loss to the income statement. An inventory
adjustment will change the value of the inventory balance and
will assign a loss/gain to the expense account that is mapped
for inventory adjustments. The standard GL mapping configuration
has this mapped to GL account inventory adjustments (recounts).
But, you can confirm where it is mapped in your system by navigating
to Setup > Ledger Settings
and then finding which expense account is mapped to Inventory
recount expense.
|
If you enter an Actual Quantity that is less than the In Stock current value, you can click the Advanced button to prioritize the batches of inventory. Using the small up or down arrows, you can move a batch from Available Batches to Priority Batches. See the figure below.
Batches higher in the Priority Batches list will process first, so the recount will use the list of priority batches beginning with the first batch in the list and continue down the list. If you do not specify a priority batch, Shop Manager will use the oldest inventory first. (NOTE: this feature is not available on consignment items.)

To purge unwanted items from your inventory items database, you can delete them if you're sure that you no longer need them. Inventory items can be deleted only if the quantity on hand is zero.
| Delete only from Setup: It's only possible to delete inventory items from within the Setup module. |
To delete an inventory item, do the following:
Click the Setup button in the ribbon.
In the left-hand menu, find and click Inventory Setup > Inventory Materials, as shown in the figure below.
Follow the steps in Search by Part Number section above to search for parts.
Select one or more parts in the listing.
Click on the Delete button, and then click Yes to confirm.

In this section, we assume that you've become familiar with basic inventory setup, so that you know about setting the low and high quantities for reordering. Also in setup, you can also choose a default supplier for an inventory item.
Here, we explain how to reorder inventory, and also how to create a purchase order from within inventory. You can perform any of these tasks from either the Setup module or by clicking Utilities > Inventory from the ribbon.
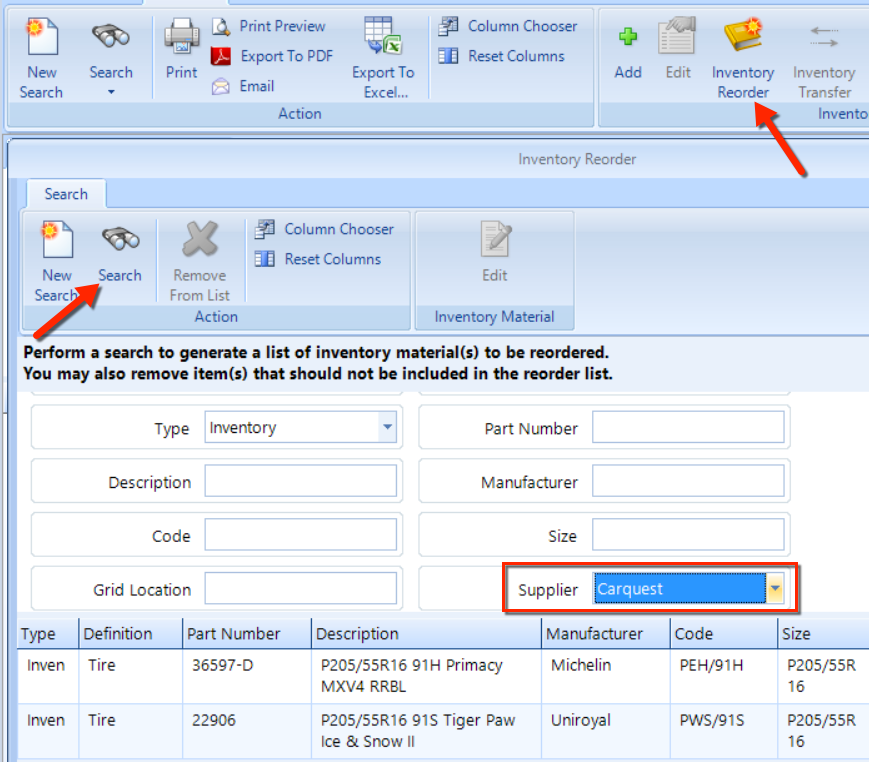
Follow these steps to generate a reorder list for tires from a single supplier:
Access the Inventory Materials module, as we explain at the top of this article.
Click Inventory Reorder button in the ribbon.
Choose Automotive Service from the Profit Center drop-down, then choose Inventory in the Type drop-down.
Choose a Supplier, such as Carquest.
Click the Search button in the ribbon at the top to get a list of inventory items that match your criteria.
As we show in the figure, we get two types of tires that we source from this supplier. Continue with the instructions below.
Click Next to move all of the items into the Inventory Reorder window. You can change the appearance of the listing in that window by choosing visible columns and also setting the level of sales data you want to see.
Include sales: To display sales numbers, click the Include Sales button and then choose Start and End Dates to set a date range.
Choose columns: To decide which columns appear in this window, click the Column Chooser button in the ribbon.
Sort on a column: You can sort on a column. For example, click the Need column heading twice to show the higher numbers at the top of the listing.

The Low and High numbers will typically drive ordering, but there may be times when you anticipate a need to order more or less than these limits. This includes the case in which a significant number were sold in the sales data range selected.
Automatic
calculation of order amount: The order amount
will be automatically calculated on one the following:
|
Change the Order amount: To increase amount to order, follow the steps below.
Locate the item for which you want order more items.
Click directly into the Order cell for this item.
Using the small arrows inside the cell, adjust the value to match the number that you need to order.
Click off of this row onto another row to commit your changes. The row color will change to pink, as shown in the figure below.
If you are done, click the Next button. Below, we explain how to add changes in this reorder to a purchase order.
Cancel ordering: To cancel the upcoming order, follow the steps below.
Locate the item for which you want to cancel its upcoming order.
In the ribbon of the Inventory Reorder window, click the Do Not Order button (see the figure below).
Click off of this row onto another row to commit your changes.
If you are done, click the Next button. Below, we explain how to add changes in this reorder to a purchase order.

You create the purchase order in the last step of the reorder process. The supplier is the same as it was in the previous steps, but you may select a different one in the Supplier drop-down.
Add to an existing purchase order: If you would rather add these reorder items to an existing open purchase order, choose that PO # from the drop-down.
To create the purchase order, click the Create button and then click Yes to confirm. The purchase order will appear in a new tab.
Keep in mind that the purchase order is open until you mark it as placed. When the items arrive, you can receive the items into inventory. See the Purchase Orders article for complete details on managing purchase orders.
A batch of inventory is the quantity that is received in a single transaction. Shop Manager works on the FIFO (first in, first out) principle, so it tracks each batch of inventory that is received. To be consistent with FIFO, the oldest batch of inventory is depleted first.
Follow these steps to generate a reorder list for batteries from a single supplier:
Access the Inventory Materials module, as we explain at the top of this article.
Choose Automotive Service from the Profit Center drop-down.
Choose Electrical in the Service Category drop-down.
To retrieve all the batteries, enter "battery" in the Description field.
Click the Search button in the ribbon at the top.
View the item with a Part Number of "647MF" from the listing by double-clicking on it, then click the Batch tab as we show in the figure below.
To edit a batch, choose that batch from the list and then click on the Edit Batch command button in the ribbon.
In the Inventory Batch pop-up window (see the figure below), you can change the values in either of these fields:
Total Cost – the total cost of the batch
Total Core – the total core cost of the batch
Click the OK button to commit your changes.

There are a number of inventory reports that you can run as-is or customize, including:
Inventory Cost
Inventory Summary
Inventory Cost/Recount
Inventory Dead Stock
Inventory Listing
Inventory Listing/Recount
It's easy, for example, to run a simple Inventory Cost/Recount report:
Click on the Reports button in the ribbon.
In the left-hand menu, click on Inventory > Inventory Cost/Recount Report.
Enter a Part Number, such as S2000085.
In the figure below, we see the results. You can enter information in any or all of the Input Parameters panel.
