 Work In Progress
The Shop Manager work flow management module includes a variety of features for creating and managing work orders, credits, estimates, and appointments. You can manage and organize all of these from the initial appointment all the way through to the posting of the invoice—while also keeping track of all intermediate stages such as write-up, technician assignment, and job status.
Watch the following video as a supplement to reading this article:
To access this feature, click the Work Orders button in the ribbon to open the Work In Progress pane.
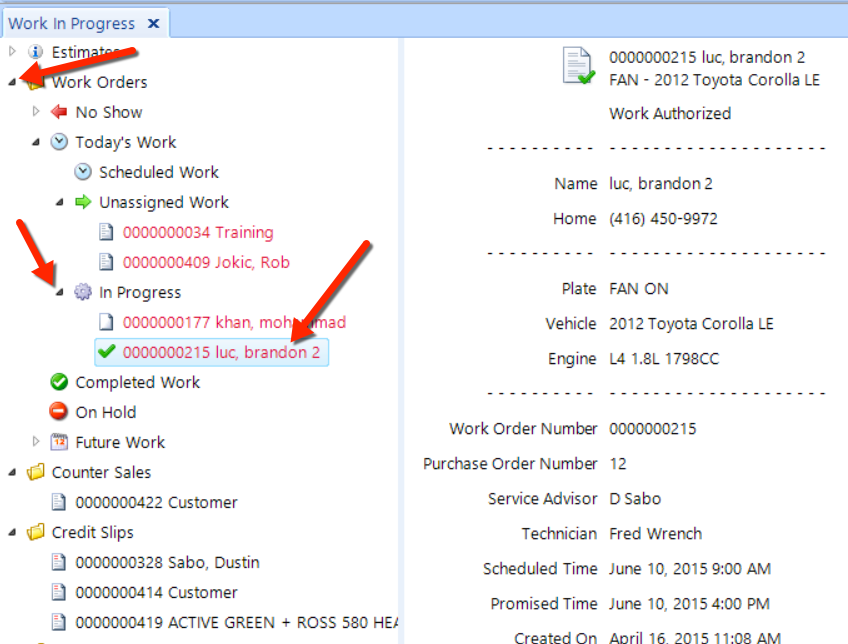
The left window pane of the Work In Progress tab contains a number of items, some of which you can expand and contract by clicking the small arrow (see the figure below). Clicking on an item–such as one of the In Progress items–will display summary results in the right window pane. Double-click any document to open it and edit its details. Right-click over a document to view additional options. Move the divider line between the to change the width of window pane.
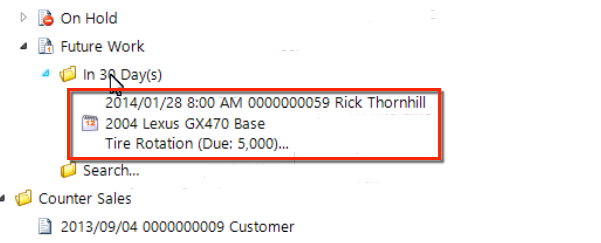
The Future Work folder contains appointments that were setup with the work order scheduler and also appointments that were automatically booked at the end of a previous service. In this figure, we see an upcoming appointment:
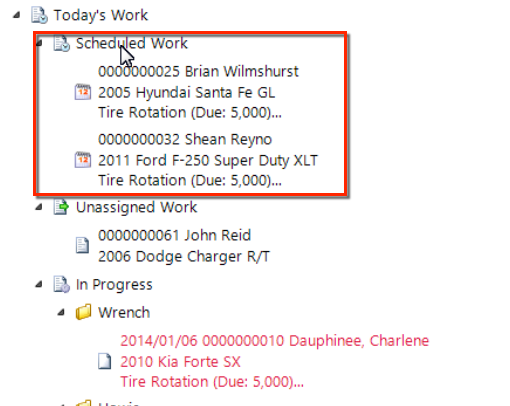
On the day that an appointment comes due, it will appear under Today's Work > Scheduled Work. In the figure, we see two examples of such appointments:
In the sections below, we describe each of the features of this module in detail.
By changing the work-in-progress options, you can control the function and appearance of the Today's Progress > In Progress subfolder. There are options for configuring the sorting, grouping, and the amount and types of information that displays with each document at different stages of the workflow.
To access these options: From within the Work Orders feature, click the small pop-out arrow found in the bottom right of the Work Order group on the ribbon (see the figure below).
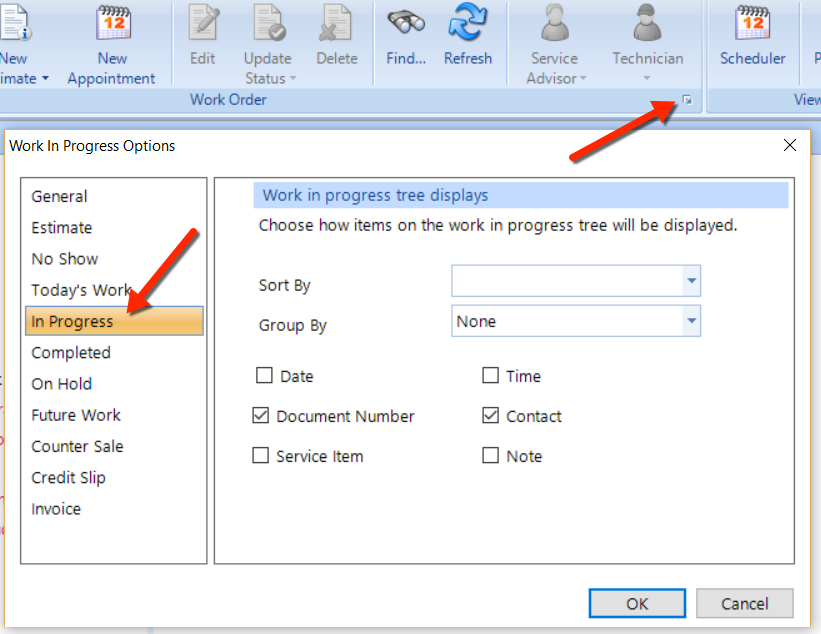
The left pane of the Work In Progress window presents a cascading series of folders and subfolders. Many of the options given below apply to most of the subfolders, but some options don't apply to some of the subfolders. The software intelligently and contextually configures which options are available. As shown in the figure above, the left window pane of the Work In Progress Options popup window represents each node. Click on each to display (in the right window pane) the formatting options that correspond to that folder or subfolder.
Sort By – From this drop-down list, choose how you want sort the folder or subfolder:
Document Number - Each document (work order, estimate, credit slip, invoice) has a sequential identifier.
Creation Time - The time the item was created.
Scheduled Time - The appointment time of the item.
Promised Time - The time the vehicle is to be ready for the customer.
Invoiced Time - The time the invoice was posted.
Contact - Alphabetically by contact name.
Group By – From this drop-down list, choose how you wish to group the folder or subfolder:
None - No grouping will apply, and all items will appear in a simple listing according to the Sort By selection (see above).
Technician - Folders will appear with the technician's display name, and all items assigned to that technician will appear in a listing according to the Sort By selection (see above).
Service Advisor - Folders will appear with the service advisor's display name and all items assigned to that service advisor will appear in a listing according to the Sort By selection (see above).
Date – check this box to display the date of the item.
Time – check this box to display the time of the item.
Document Number – check this box to display the document number of the item.
Contact – check this box to display the contact name.
Service Item – check this box to display the service item.
Note – check this box to display any notes that correspond to the item.
This folder is for managing estimates. Expanding it to reveal two subfolders, In 30 Days and Search. Click the In 30 Days subfolder to display a list of estimates that have been entered within the last 30 days–sorted from the newest to the oldest. Click an item to view a summary of the document in the right window pane, as shown in the figure below.
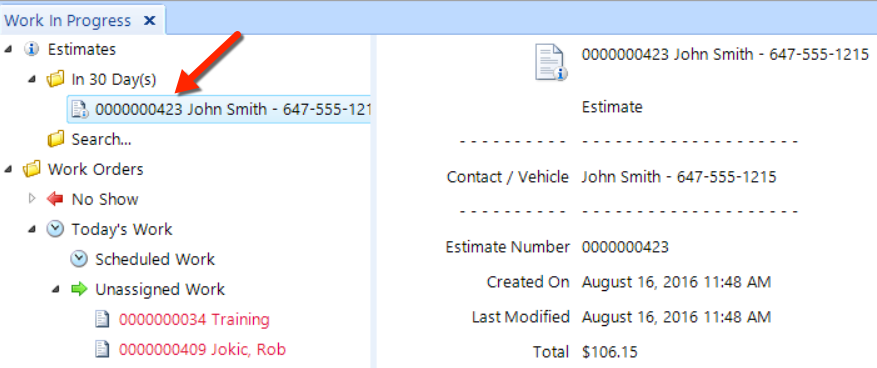
Double-click and estimate item to open and edit it, if necessary. If the estimate is no longer useful, click the Delete button in the ribbon (or right-click over the document name in the left window pane and click Delete in the pop-up menu).
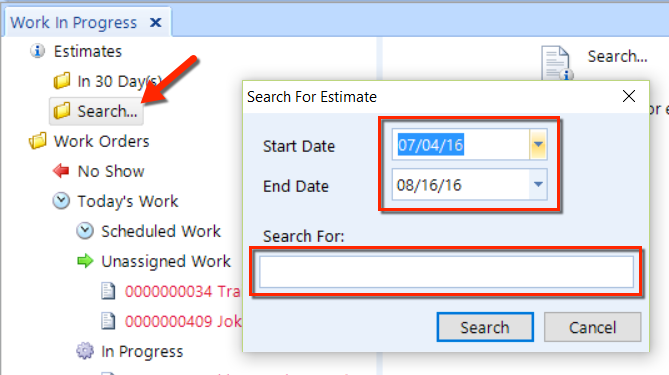
To search for an estimate, double-click on the Search item in the left window pane to open a popup window. There, you can specify a date range by choosing a Start Date and an End Date, and optionally enter one or more search terms in the Search For field. The search terms can be any part of the contact or service item descriptions within the estimate.
This folder is the main feature for managing work orders. This folder is typically open by default, and it contains several sub-folders:
No Show
Today's Work
Completed Work
On Hold
Future Work
We explain each of these subfolders below.
Expand this subfolder to manage work orders for customer that did not show up for their appointment.
Click the In 30 Days folder to see the most recent no-show work orders. Click a work order item to view a summary of the document in the right window pane, or double-click the item to open the document for editing. To delete a work order in this subfolder, select it and then click the Delete command button.
Double-click on the Search subfolder to search for no-show orders in the same manner as we describe in the Estimates section above.
This subfolder contains several additional subfolders, each of which we describe below. From these subfolders, you can manage appointments and the work in progress for today.
Scheduled Work – contains a listing of work orders for today's appointments.
Unassigned Work – contains a listing of work orders for vehicles that are on-site but have not been assigned to a technician.
In Progress – contains a listing of documents for vehicles that have been assigned a technician. This subfolder may contain additional subfolders, depending on the setting in your work in progress options.
In any of these subfolders, click a work order item to view a summary of the document in the right window pane, or double-click the item to open the document for editing. To delete a document, select it and then click the Delete command button.
This subfolder contains a listing of documents for vehicles on which all work is complete. All line items on the work order should be fully resolved before a work order is saved as completed work. As with many other subfolders, you can click a document to view a summary in the right window pane, or double-click the item to open the document for editing. To delete a document, select it and then click the Delete command button.
This subfolder contains a listing of documents for vehicles on which the work is on hold. Typically, this status is given to a vehicle that is off-site for sublet work–or the work can't continue until parts arrive. It's important to realize that you can specify the circumstances for which a work order is in a hold status.
As with many other subfolders, you can click a document to view a summary in the right window pane, or double-click the item to open the document for editing. To delete a document, select it and then click the Delete command button.
Expand this subfolder to manage work orders for future appointments.
Click the In 30 Days folder to see the work orders upcoming for the next 30 days. Click a work order item to view a summary of the document in the right window pane, or double-click the item to open the document for editing. To delete a work order in this subfolder, select it and then click the Delete command button.
Double-click on the Search subfolder to search for future work orders in the same manner as we describe in the Estimates section above.
From this folder, you can manage counter sales–which are work orders that do not involve a vehicle. Commonly, these sales only involve over-the-counter transactions for parts or tires.
This folder contains a listing of in-progress credits to customers. If a decision has been made to issue a credit to a customer with respect to a previous purchase, it will appear in this listing–if it has not been finalized. After posting, becomes a credit invoice (see the Credit Invoices section below).
Click the Last 25 Invoices subfolder to view the 25 most recent invoices. Click an item to view a summary of the invoice in the right window pane, or double-click the item to open the document for editing. To delete a work order in this subfolder, select it and then click the Delete command button.
Double-click on the Search subfolder to search for no-show orders in the same manner as we describe in the Estimates section above.
Click the Last 25 Credit Invoices subfolder to view the 25 most recent credit invoices. Click an item to view a summary of the credit invoice in the right window pane, or double-click the item to open the document for editing. To delete a work order in this subfolder, select it and then click the Delete command button.
Double-click on the Search subfolder to search for no-show orders in the same manner as we describe in the Estimates section above.
If you open a work order that is already open by someone else, you'll receive a prompt that indicates the computer on the network that currently has it open. In such a case, we recommend that you open the work order for viewing purposes only. If you choose to open it, you must type in the word "yes" at the prompt.
If the same work order is open by multiple users, the final state of the work order will typically be the state in which the last user saves that work order. The same applies to cases in which multiple users edit an existing line item, appointment time, promised time, technician, or service advisor.
Users that add new line items, concerns, inspections and services can expect that their changes will persist after saving their edits.
As you're working in the folder/subfolder structure of the Work In Progress feature, you can select a folder or subfolder and then click the Search subfolder. Often, if your only task is to perform a search, it may be more efficient to use the Find button in the ribbon.
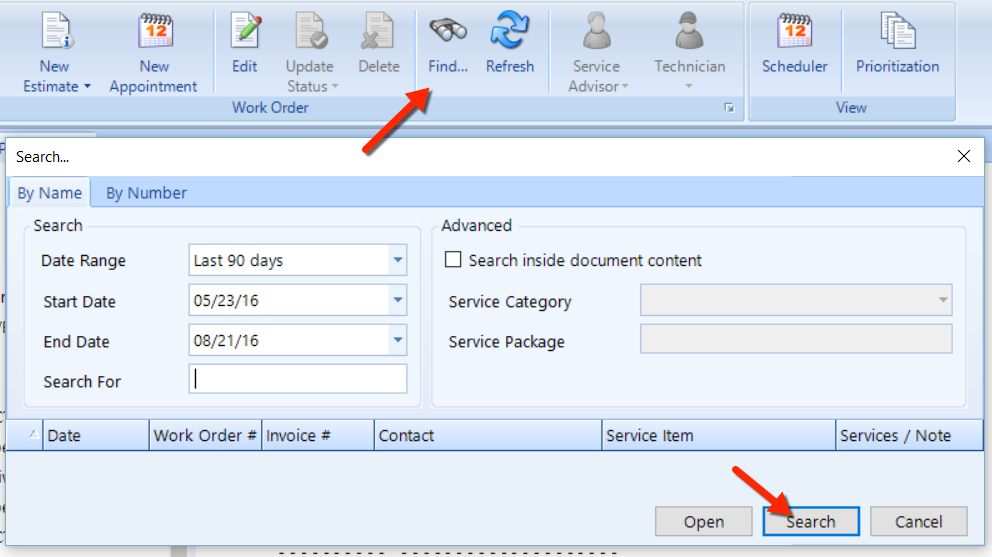
To perform a general work order search, begin by clicking the Find button on the ribbon. You have two find methods to choose from, By Name or By Number. We explain each of these below.
This is the first tab that is visible in the Search pop-up window after you click the Find button in the ribbon (see the figure below). It contains the following search options:
In the Search panel, choose a Date Range from the drop-down list, or click the Start Date and End Date to precisely set a custom date range.
In the Search For field, enter text that corresponds to either a contact name or service item.
In the Advanced panel. click the check box preceding Search inside document content, and then make selections in the two drop-down boxes that we explain below.
Choose a Service Category from the drop-down list to search for documents that contain services within a specific service category.
Enter one or more terms in the Service Package field to search within the title of a service, concern or inspection.
After specifying all of the criteria that you can, click the Search button to display a listing of documents that match your search terms. Select the document and then click the Open button to retrieve it.
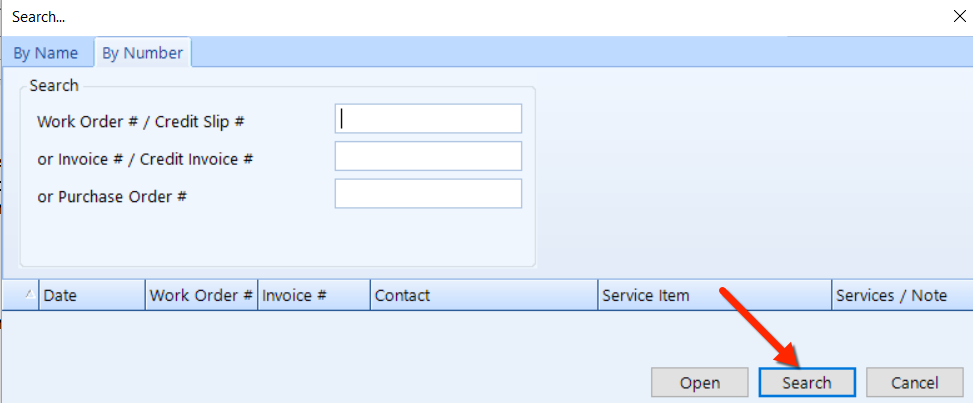
Click this tab if you want to search using a document number (see the figure below). This type of search is applicable to work orders, credit slips, invoices, credit invoices and purchase orders.
In one or more of the fields, enter the document number and then click the Search button to display a listing of documents that match your search terms. Select the document and then click the Open button to retrieve it.
Work order details in the work-in-progress window pane may appear in different color font, including black, magenta, or red. The purpose of the color scheme is to alert the service advisor and technician concerning the time available to finish the work, relative to the time that the vehicle was promised.
Black - Current time is outside of 1 hour from the stated promised time
Magenta - Current time is within 1 hour of the stated promised time
Red - Current time is after the stated promised time
For this feature to function effectively, promised times should be discussed with every customer and accurately set on each work order to ensure that the font color accurately reflects the actual situation. As such, it will likely be necessary to actively adjust the promised time as a vehicle flows through work-in-progress to reflect any changes in circumstance–such as the sale of additional mechanical work which may require adjust to a delayed promised time. Edit the promise time by opening the work order and adjusting the promise timed in the right panel.
This brings us to the end of this article. Next, we invite you to read our New Work Order article.